AUTOMOTIVE
Installation Guide for FPV Drone Motors: Tips and Procedures
1. Introduction
FPV (First Person View) drones are beloved by drone enthusiasts for their agility, speed, and ability to offer an engaging perspective during flight. Installing motors on an FPV drone is a crucial phase to ensure optimal performance and safety during flight. In this guide, we will explore the basic details of installing drone motor on FPV drones, including ESC/motor compatibility, motor mounting, cable routing, measuring cables to fit desired lengths, and troubleshooting common issues.
2. ESC/Motor Compatibility
Before starting the motor installation process, it’s essential to ensure that the Electronic Speed Controllers (ESCs) are compatible with the motors you intend to use. ESCs regulate the speed and direction of motor rotation and must be capable of handling the current required for motor operation. Therefore, it’s necessary to ensure that the ESCs support the current and voltage required by the motors, in addition to being compatible with the drone’s flight controller firmware.
3. Motor Mounting
3.1. Motor Attachment
Use appropriate screws and nuts to secure the motors to the drone frame. Ensure that the motors are securely fastened to prevent unwanted movements during flight and that the screws do not touch or are close to the stators (this could cause motor overheating issues).
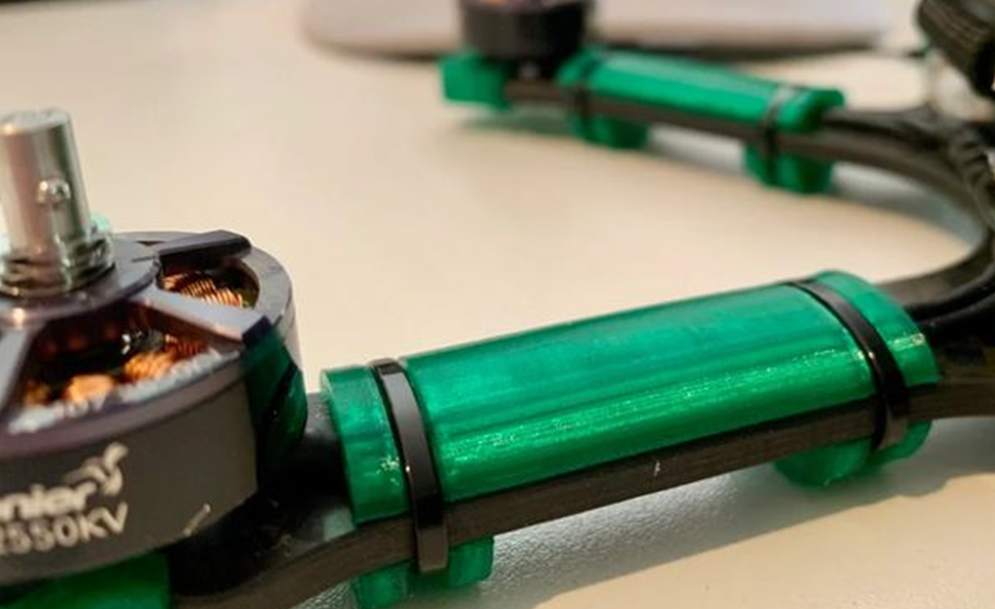
3.2. Use of Insulating Gaskets and Racewiring
To reduce vibrations and protect electronic components, it is advisable to use insulating gaskets between the motors and the drone frame. Racewiring can also be used if the motor cables are too short or if you want to facilitate motor replacement in the future.

3.3. Cable Routing
3.3.1. Planning Cable Routing
Before connecting the motor cables to the ESCs, plan the cable routing to ensure a neat and safe installation. Avoid cable crossings or tangles that could interfere with motor movements or other drone components. It’s also possible to route the cables internally between the Flight Controller (FC) and ESC (in the case of a stack), which helps to have a cleaner build visually and allows leaving the motor cables longer; however, leaving internal cables may cause vibrations.
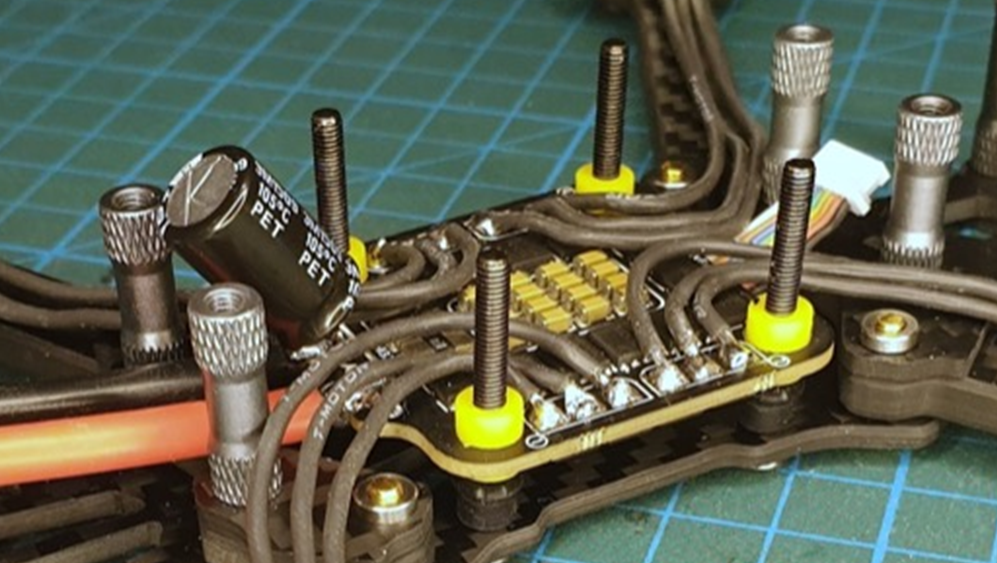
3.3.2. Use of Cable Protections and Fastening
To prevent leaving the cables loose, it is necessary to protect and secure them on the arm; for this purpose, there are several solutions: hard plastic tubing (not recommended because they break at the first crash), electrical tape, zip ties, cloth tape (the best in experience), etc.
3.4. Measuring Cables
3.4.1. Determine Cable Length Measure
The distance between the motors and ESCs to determine the length of cables needed. It is advisable to leave an additional margin to allow for movements and adjustments during installation. Pay attention to the frame type; the length of cables may vary depending on the arm.
3.4.2. Cable Cutting Once
The desired cable length is determined, carefully cut them using pliers or scissors designed for electrical cables, strip the ends, and pre-solder them.
3.4.3. Cable Soldering Connect
The motor cables to the ESCs using the appropriate soldering technique. Ensure that the connections are solid, secure, and that the solder does not contact adjacent pads or other ESC components to avoid false contacts, disconnections during flight, or short circuits.
By carefully following these steps and considering component compatibility, mounting motors on an FPV drone can be a rewarding process that improves the performance and stability of your drone during flight. Always remember to perform a thorough pre-flight check to ensure that all components are properly installed and functioning as expected; now let’s move on to motor configuration.
4. Motor Configuration
Configuring motors on an FPV drone is a crucial step to ensure optimal performance and a good flying experience. Using a flight configurator, such as Betaflight, Cleanflight, or Kiss, you can customize various parameters to tailor your drone’s behavior to your flying preferences. Below are the various steps to configure motors with our flight configurator.
4.1. Connection and Preparation
Before starting, make sure your drone is connected to the computer via a USB cable and that the flight configurator is open and correctly configured to communicate with the drone. Also, ensure that the propellers have been removed, and the drone’s battery is disconnected to avoid accidents.
4.2. Access to the Motor tab
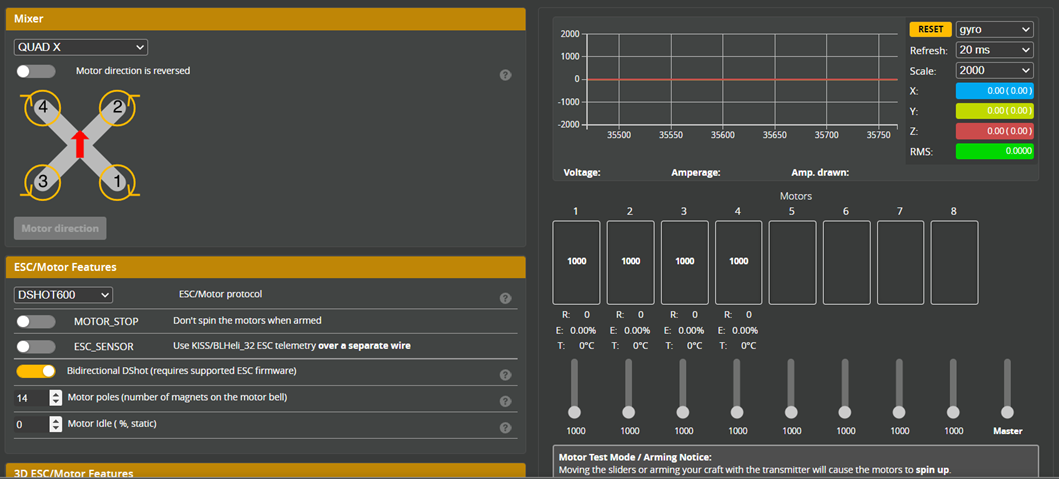
Once connected, open the flight configurator and go to the section dedicated to motors. This section will allow you to adjust the parameters of individual motors according to your needs; this is where we will begin our configuration.

4.3. Checking Motor Order and Rotation Direction
Ensure that your drone’s motors are connected to the correct pins on your flight control board. Otherwise, the motors may spin in the wrong direction or not respond correctly to inputs. Check that the motor order is correct or change it through the configurator. Once it is confirmed that the order is correct, check the rotation direction (prop-in/prop-out) and that all motors respect the correct direction.
4.4. Motor Settings
Now is the time to adjust the motor settings. These settings include maximum motor speed, communication protocol, and other advanced options. Make sure you have your motor and ESC manuals handy to correctly configure the settings. For example, on a blheli_s ESC, it is recommended to download the Bluejay firmware.
4.5. Motor Testing
After setting the motor parameters, it is advisable to perform a test to ensure that all motors spin in the correct direction and respond uniformly to throttle inputs (WARNING: remove the propellers as previously stated). You can do this using the flight configurator, which will allow you to individually activate each motor.
4.6. Fine Tuning and Flight Test
Once the motor configuration is complete, it is advisable to perform some flight tests to verify that the drone behaves as desired. If necessary, further adjustments can be made to the motor parameters to improve performance or adapt the drone’s behavior to your flying preferences through PID tuning.
4.7. Safety Considerations
Before taking off, always make sure to perform a thorough check of your drone to ensure that all components are securely fastened and that there are no obvious damages. Always respect local regulations and fly in designated areas to avoid accidents and hazards to yourself and others.
We have seen how to mount and solder the motors, how to configure them; now let’s see the most common issues we may encounter.
5. Resolving Common Issues During FPV Drone Motor Installation
As we have seen, installing motors on an FPV drone is a crucial part of building a quadcopter. However, some issues may arise during this process. Let’s see what the most common challenges are and how to address them:
5.1. Vibrations and Abnormal Oscillations
- Possible Causes: Vibrations can be caused by unbalanced motors, damaged propellers, or incorrect motor mounting on the frame.
- Solutions: Balance the motors using a prop balancer. Check that the propellers are not damaged and securely mount the motors on the frame, using insulating gaskets if necessary.
5.2. Excessive Heat on Motors
- Possible Causes: Excessive current through the motors, poor airflow, screws too long and therefore too close to the stator, incorrect PID settings, incorrect ESC firmware, can cause overheating.
- Solutions: Check that the ESCs are calibrated correctly and that the current supplied to the motors is adequate. Ensure that the airflow around the motors is sufficient , avoiding obstructions in the drone frame, recheck the screws, and finally, if the problem persists, review the PID settings.
5.3. Cable Connection Problems
- Possible Causes: Damaged cables, loose connections, or faulty solder joints can cause connection problems.
- Solutions: Inspect the cables carefully for any damage. Ensure that the connections are securely connected and that the solder joints are of good quality; also recheck the cable bends in case they have been forced and may have broken internally.
5.4. Motors Not Starting or Not Responding Correctly
- Possible Causes: Incorrect ESC configuration, power issues, motor or ESC damage, incorrect ESC-motor connections and/or ESC/FC connections can cause motor malfunction.
- Solutions: Check the ESC configuration and reprogram them if necessary. Check that the power supply is correct and that there are no interruptions in the electrical circuits. Inspect the motors for any physical damage. Recheck the connector that connects FC to ESC (in some stacks, it is necessary to pay attention to which connector is inserted into the ESC and which connector is inserted into the FC, having a different min order).
5.5. Strange Noises During Motor Operation
- Possible Causes: Some abnormal noises may indicate mechanical damage to the motors; in other cases, there may be abnormal noises due to incorrect PID settings, misaligned bells, dirty motors, or incorrect configuration.
- Solutions: Visually inspect the motors for any signs of damage or wear. Recheck the PID settings, motor, and ESC configuration, give the motors a clean.
5.6. ESC/Motor Compatibility Issues
- Possible Causes: ESCs may not be suitable for the motors in use or may not be compatible with the flight controller firmware.
- Solutions: Check the compatibility of ESCs and motors using technical specifications and manufacturer recommendations. Update the flight controller firmware if necessary.
Addressing these issues requires patience and attention to detail. With proper diagnosis and the right solutions, most problems that may arise during the installation of motors on an FPV drone can be successfully resolved. If problems persist, consult online resources (social media communities can also be a great source of help) or seek assistance from industry experts for additional support.


The adoption of electric vehicles (EVs) as the standard means of achieving sustainable mobility is quickly gaining attraction. Their cost-effectiveness and environmentally friendly approach are the two key factors contributing to their growing customer acceptance. The most urgent problem for EV drivers is still the availability of charging stations, which is especially important for individuals who travel long distances with their partners. The purpose of this article is to examine the various ev charging solutions for long-distance drivers in pairs. It is a comprehensive article that addresses this issue to ensure that the couples will enjoy the long drive without any worries while also promoting environmental conservation.
What is EV Charging?
Before we get into specifics concerning charging options, you must comprehend the basics of EV charging. Electric vehicle (EV) charging is the technique of connecting an EV to an external power supply to refill the stored energy within the battery. In contrast to gas-powered motors, which can be refueled at petrol stations, electric vehicles (EVs) use power as their number one power supply. EV charging can take place in a variety of places, inclusive of places of work, residences, public charging stations, and commercial charging networks. The charging process commonly includes three fundamental degrees:
- Level 1 Charging
This entails hooking up the device to a regular 120-volt household outlet. It may be quick for charging overnight, but Level 1 charging is slower than other options.
- Level 2 Charging
Level 2 charging uses a 240-volt charging station to accelerate the process compared to Level 1 charging. They are usually located at public charging stations and can be installed at home for additional benefit.
- DC Fast Charging
Fast charging DC (DCFC) is the fastest charging method available for EVs today. The chargers at the public charging stations, among which the DC fast chargers can charge an EV to 80% in 30 minutes, are perfect for long-distance travel.
EV Charging Solutions for Long-Distance Journeys
With your partner, planning a road trip in an EV can be a fantastic experience. You both can have full freedom to enjoy each other’s presence and cherish the moments with each other. However, you should explore different charging solutions to avoid any unpleasant experiences on your trips. Here are some options to consider:
- Route Planning Tools:
Before you set off, make use of route-planning apps that have been developed to help EVs. They facilitate the locating of charging stations along your route, estimate the charge times, and make the travel hassle-free.
- Public Charging Stations:
The public fast charging stations are a very important element in the EV owners’ lives, especially when going on a long journey. The charging stations are mostly equipped with Level 2 and DC fast chargers, which allow for quick recharges while the drivers take the required rests on the way. These charging stations can be of great use especially when you are driving for long with your loved ones. Additionally, if you want to know more about these EV solutions, visit EN Plus website to get in-depth knowledge about how they work.

- Destination Charging:
The planning of the route with destination charging implies the accommodation in hotels or resorts where EV charging facilities are available. It is possible to charge your EV overnight which takes care of the charging and your EV will be ready for the next day’s trip. This can help you stay energized while taking some nap and your vehicle also gets ready after its energy is filled. This can make your journey even more pleasant in the presence of your loved ones.
- Use on-the-go Chargers:
Apart from the portability of a portable charger, it is also reassuring to know that you can charge your phone during long drives. These chargers are designed to plug into standard outlets, which serve as backup solutions for charging in case of emergencies or when public charging stations are not available.
- Utilizing Sun Energy for Charging:
For couples who support eco-friendly, solar-powered chargers become a sustainable charging system. Charging EVs with solar power is another way of reducing the consumption of traditional power sources and decreasing your carbon footprint.
Tips for a Smooth Journey
To optimize your journey with your partner in your EV, consider implementing the following tips:
- Plan Ahead:
In advance take a detailed route planning and try to find stations that are located near the way. This forward-thinking method of charging the device will eliminate the risk of the device not having enough power thus making the travel experience more relaxing.
- Charge Strategically:
When you use public charging stations, try to charge your EV to 80% capacity instead of a full load. This will significantly cut down the charging times, especially if the DC fast chargers are used.
- Pack Essentials:
Take along snacks, water, and entertainment items for the breaks between charging stations and to enhance your comfort. These provisions will ensure a more quality travel experience for both of you.
- Stay Informed:
Take advantage of your EV’s built-in app or dashboard to supervise charging status as well as plan charging stops. Keeping track of your EV’s battery level will allow you to make sure you are driving in the right direction to the next charging station.
Conclusion
Charging an EV for the duration of a protracted ride with the one that you love isn’t a challenge that needs to be horrifying. By obtaining in-depth expertise in EV charging fundamentals and adopting an extended-time period strategic plan, you may be capable of having a smooth and amusing journey even as proscribing environmental damage. Given a whole lot of charging alternatives, couples can move on thrilling journeys without being stressed approximately going for walks out of power, however alternatively, they could revel in the pleasures of the instant knowing that they are helping to create a sustainable future. In addition to that, as technology develops, the EV charging infrastructure is believed to emerge as better and more good-sized, main to a high stage of comfort for EV proprietors who tour long distances. Driving EVs for long distances is not most effective in accord with ecological sustainability however also gives a sense of adventure and exploration. The charging stops aren’t only to fill your car with strength, however they’re also the locations to take a turn, contemplate, and enjoy the journey you’re having.

Introduction
Gear shifting can seem like a delicate ballet to people who switched from automatic to manual gearboxes. There’s a learning curve involving clutch control, throttle dexterity, and determining which gear is best in each given circumstance. The effect of shifting gears while driving is one subject that is frequently asked.
Skipping gears may initially appear to be a shortcut, a quicker method to go from point A to point B. But is it wise to do so? This blog explores the topic of gear skipping and how it affects the drivetrain, engine, and overall driving experience of your car.
Knowing gearing: The power band of the engine
Prior to shifting gears, let’s establish some basic comprehension. An automobile’s gearbox functions similarly to a variable speed changer, enabling the engine to deliver power effectively at varying driving speeds. The relationship between engine RPM (revolutions per minute) and wheel rotation speed is changed by the particular ratios of each gear.
Consider the engine as a power plant with a sweet spot where it produces maximum power and fuel economy. It’s common to refer to this sweet area as the “power band.” For smooth acceleration and effective operation, gears are selected to maintain the engine’s RPM within this power band.
Upshifting vs. downshifting when skipping gears
Whether you’re downshifting (going to a lower gear) or upshifting (going to a higher gear) determines how skipping gears will affect you. Let’s investigate each situation:
- Upshifting: Generally speaking, the engine and drivetrain aren’t as damaged when shifting up (from, say, second to fourth) without changing gears. But because there’s a bigger gap to bridge between the engine’s RPM and the vehicle’s speed, it can result in a jarring ride. Furthermore, if it’s not done smoothly, the clutch may have to work harder to synchronize the engine and transmission speeds.
- Downshifting: This is the point at which it’s riskier to skip a gear. Imagine driving at highway speeds and dropping from fifth to second gear. The engine would likely bog down or perhaps stall as a result of the sharp drop in engine RPM. Furthermore, downshifting can put a great deal of stress on the drivetrain’s components, increasing wear and tear, if correct rev-matching—adjusting engine RPM to match the lower gear—is not done. In severe cases, drivetrain damage may result from it.
The rev-matching art: A talent worth developing
Rev-matching is a method usually utilized by experienced manual gearbox drivers to achieve seamless downshifting. Before engaging the lower gear, blip the throttle, or briefly press and release the gas pedal, to get the engine RPM closer to what is anticipated for that gear. This lessens the shock felt during a significant gear drop and facilitates a smoother transition.
While rev-matching isn’t necessarily required for everyday driving, it becomes important when driving in performance-oriented scenarios or while making a sudden turn or other fast deceleration. By perfecting this method, you can prevent needless wear and tear on your car’s drivetrain while also improving the driving experience.
The effect on engine performance
The performance of an engine can be subtly affected by shifting gears. How to do it is as follows:
- Fuel Economy: To get the best fuel economy, gears should ideally be selected to keep the engine operating within its powerband. The engine can be forced out of this sweet spot by skipping gears, which could result in decreased fuel efficiency.
- Engine Wear: Engine parts like bearings and synchronizers may experience higher wear as a result of frequent rapid gear changes or incorrect downshifting. This can therefore result in the requirement for early maintenance.
When is it okay to switch gears?
In certain rare circumstances, skipping gear could be permissible. For instance, skipping gear during upshifting may be suitable if you need to gain speed quickly when merging onto a highway (as long as it’s done smoothly). But this shouldn’t turn into a daily routine.
For maximum engine performance, fuel economy, and the least amount of wear and tear, the general best course of action is to concentrate on smooth, methodical gear changes that maintain the engine inside its powerband.
Safety factors: Preserving mastery
Skipping gears can have an impact on safety in addition to its mechanical consequences. Your concentration and ability to operate the car may be momentarily impaired by a sudden or abrupt shift in gear. This is especially obvious when you downshift and the car behaves very differently.
A more predictable driving experience and improved vehicle control are made possible by maintaining seamless gear shifts. This translates into increased road safety for both you and other drivers.
Conclusion
While skipping gear might seem like a time-saving tactic, it’s important to understand its potential drawbacks. Respecting the rhythm of your car by choosing the appropriate gear for the situation not only protects your engine and transmission from unnecessary wear and tear but also ensures a smoother driving experience and better fuel efficiency. By adhering to the recommended gear sequence, drivers can optimize the performance and longevity of their vehicles. So, next time you’re behind the wheel, remember to respect the rhythm of your gears and engine for a more harmonious driving experience.
All those in need of used engines and transmissions in the United States must visit Used Engines, Inc.

If you are stuck between deciding whether to buy a car or opt for a monthly car rental Dubai then it is no coincidence that you are here. The main reason many people find themselves in this dilemma is due to saving money, but worry not, in this article, we are going to shed light on the best way to use a car without burning a hole in your pocket.
As the global population is on the rise, more vehicles are needed to convey people from place to place. However, as a result of more vehicles being produced to meet the rising demand for transportation, another insurmountable problem is born: Road traffic congestion and environmental pollution. The good news is that people are becoming more environmentally friendly and are now seeking improved alternatives to this pressing issue. This has led to a surge in the popularity of Dubai car hire services.
Advantages of monthly car rental Dubai
We all know that owning a car comes with several challenges such as maintenance and repair, annual depreciation of value, registration and taxes, and insurance costs. Whereas renting a car from a reliable agency like OneClickDrive allows you to drive any vehicle of your choice in whichever way you choose and pay rent for the usage.
Furthermore, if you are a hustler seeking opportunities and therefore need to move from one city or even country to another regularly, buying a car is not sustainable. What you need is a good rental service to keep you mobile wherever you go without long-term commitments.
Additionally, many people are of the opinion that owning a car is often seen as a symbol of wealth and status. While this is true, it also has some concerns. A car is a depreciating asset, meaning the moment you pay for it, the value starts to decrease. You can lose up to 20% of value within the first year. On the other hand, when you rent a car, you don’t have to worry about the cost of depreciation or even maintenance and repair as that will be taken care of by the rentals.
For people who are not frequent travelers, buying a car could be a waste of money. Because this implies that even if you drive it for only 100 days in a year, you are paying for the whole 365 days. On the other hand, you can rent a car only when needed even if it is as seldom as 2 hours in a day or 4 days in a week. You only pay for how much time you are using it.
Finally, car rental offers an opportunity to experience your dream lifestyle, even if only temporarily. Let’s be realistic, many people cannot afford to own their dream vehicle outright. However, with the option to rent a car, you can enjoy driving your dream vehicle without the substantial expense of purchasing it.
Conclusion
The choice between renting and owning a car may differ from one person to another due to several factors specific needs and preferences. However, most people would prefer to rent a car as it offers more flexibility and convenience, especially for short-term use. Moreover, long-term car rental options ensure that you have a reliable replacement vehicle without worrying about the problems of selling or updating it when a new model comes out.

 HOME IMPROVEMENT1 year ago
The Do’s and Don’ts of Renting Rubbish Bins for Your Next Renovation
- BUSINESS1 year ago
Exploring the Benefits of Commercial Printing
- HOME IMPROVEMENT10 months ago
Get Your Grout to Gleam With These Easy-To-Follow Tips

 BUSINESS1 year ago
Brand Visibility with Imprint Now and Custom Poly Mailers
- HEALTH10 months ago
Your Guide to Shedding Pounds in the Digital Age
- HEALTH10 months ago
The Surprising Benefits of Weight Loss Peptides You Need to Know
- TECHNOLOGY1 year ago
Dizipal 608: The Tech Revolution Redefined

 HEALTH1 year ago
Happy Hippo Kratom Reviews: Read Before You Buy!