HOME IMPROVEMENT
Antique Brass Door Handles vs Modern Finishes: Which Should You Choose?
When it comes to interior design, door handles are small but mighty elements that can significantly influence the look and feel of your home. Choosing the right door handle finish is a critical decision, as it impacts both aesthetics and functionality. Two popular options—antique brass and modern finishes like matte black, brushed nickel, or polished chrome—offer distinct vibes and benefits. But which one is right for your space? In this article, we’ll compare antique brass door handles with modern finishes, exploring their unique characteristics, advantages, and ideal applications to help you make an informed choice.
Understanding Door Handle Finishes
Door handle finishes are more than just a color or sheen—they define the personality of a room and contribute to its overall ambiance. Antique brass brings a warm, vintage charm, while modern finishes offer sleek, contemporary appeal. Each option has its own strengths, making them suited to different design styles and preferences. Let’s dive into the details of each to understand what sets them apart.
- Dig deeper into the topic—explore a related post tailored for you.
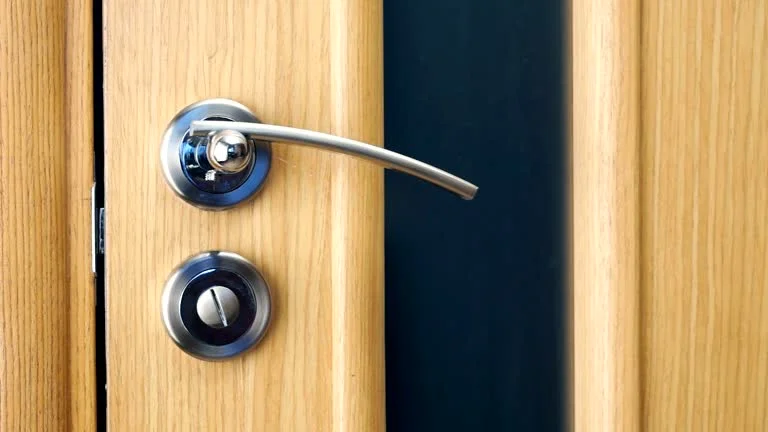
What Are Antique Brass Door Handles?
Antique brass handles have a rich, aged appearance that evokes timeless elegance. The finish is typically achieved by treating brass to create a patina, giving it a slightly weathered, golden-brown hue. These handles often feature intricate detailing or classic shapes, making them a favorite for traditional, vintage, or eclectic interiors.
What Are Modern Finishes?
Modern finishes encompass a range of sleek, polished, or matte options, including matte black, brushed nickel, polished chrome, and stainless steel. These finishes are characterized by clean lines, minimalistic designs, and a contemporary aesthetic. They’re popular in modern, minimalist, or industrial-style homes, where simplicity and sophistication take center stage.
The Aesthetic Appeal of Antique Brass Door Handles
kitchen cupboard handles are a go-to choice for homeowners seeking warmth and character. Here’s why they’re so appealing:
Timeless Elegance
Antique brass has a classic, enduring quality that pairs beautifully with traditional or vintage-inspired interiors. Whether it’s an ornate knob in a Victorian home or a simple lever in a cozy cottage, antique brass adds a touch of history and sophistication. Its warm, golden tones complement wood furniture, soft color palettes, and textured fabrics.
Versatility Across Styles
While often associated with traditional design, antique brass can work in a variety of settings. In eclectic spaces, it adds a layer of warmth to balance bold colors or patterns. In transitional homes, it bridges the gap between classic and modern elements, creating a harmonious look.
Unique Patina
The aged patina of antique brass gives each handle a unique character, as the finish evolves over time. This natural aging process adds depth and charm, making your handles feel like cherished heirlooms rather than mass-produced hardware.
Ideal Applications
Antique brass handles shine in spaces like:
- Traditional Homes: Pair with oak doors and classic furniture for a cohesive, elegant look.
- Farmhouse Kitchens: Use on cabinetry to enhance a rustic, homely vibe.
- Vintage-Inspired Rooms: Combine with floral wallpapers or antique decor for a nostalgic feel.
The Appeal of Modern Finishes
Modern finishes like matte black, brushed nickel, and polished chrome offer a sleek, contemporary aesthetic that’s perfect for today’s minimalist and industrial trends. Here’s what makes them stand out:
Clean and Minimalist Look
Modern finishes are all about simplicity and sophistication. Matte black handles create bold contrast, brushed nickel offers understated elegance, and polished chrome adds a touch of glamour. These finishes work well in spaces where clean lines and neutral tones dominate, such as modern lofts or Scandinavian-inspired homes.
Durability and Low Maintenance
Many modern finishes, like brushed nickel and stainless steel, are designed to resist fingerprints, smudges, and corrosion, making them ideal for high-traffic areas like entryways or bathrooms. Matte black is also low-maintenance, though it may require occasional cleaning to maintain its sleek appearance.
Bold Design Statements
Modern finishes are perfect for homeowners who want their door handles to make a statement. For example, matte black levers on white doors create a striking, graphic effect, while polished chrome knobs add a reflective shine that elevates contemporary spaces.
Ideal Applications
Modern finishes are best suited for:
- Contemporary Homes: Pair with flat-panel doors and sleek furniture for a streamlined look.
- Industrial Spaces: Use matte black or stainless steel handles to complement exposed brick or metal accents.
- Minimalist Interiors: Combine with neutral palettes and geometric shapes for a clean, uncluttered aesthetic.
Comparing Antique Brass and Modern Finishes
To help you decide, let’s break down the key differences between antique brass and modern finishes across several factors:
Aesthetic Compatibility
- Antique Brass: Best for traditional, vintage, farmhouse, or eclectic interiors. Its warm tones complement wood, soft neutrals, and textured materials.
- Modern Finishes: Ideal for contemporary, minimalist, or industrial spaces. They pair well with cool tones, glass, and metal elements.
Maintenance and Durability
- Antique Brass: The patina may continue to age, which some homeowners love for its character. However, it may require occasional polishing to prevent tarnishing, especially in humid environments.
- Modern Finishes: Brushed nickel and stainless steel are highly durable and low-maintenance, resisting fingerprints and corrosion. Matte black is also low-maintenance but may show dust in bright lighting. Polished chrome requires regular cleaning to maintain its shine.
Cost Considerations
- Antique Brass: Often moderately priced, though high-end or intricately designed handles can be more expensive. Vintage or reclaimed options may also vary in cost.
- Modern Finishes: Prices range widely depending on the material and brand. Brushed nickel and matte black are often affordable, while high-quality polished chrome or designer handles may cost more.
Installation and Versatility
- Antique Brass: Works well with a variety of door types, from solid wood to painted surfaces. Its classic look makes it versatile for both interior and exterior doors.
- Modern Finishes: Equally versatile but often chosen for specific aesthetics, like matte black for bold contrasts or brushed nickel for seamless integration with modern appliances.
Tactile Experience
- Antique Brass: Feels warm and substantial, with a slightly textured patina that adds to its charm. Ideal for homeowners who value a tactile, handcrafted feel.
- Modern Finishes: Smooth and sleek, modern finishes like brushed nickel or matte black offer a refined, effortless grip, perfect for high-use areas.
Practical Tips for Choosing the Right Finish
Choosing between antique brass and modern finishes depends on your style, budget, and practical needs. Here are some tips to guide your decision:
Consider Your Interior Style
Start by assessing your home’s overall design. If your space features warm tones, wood furniture, or vintage decor, antique brass is likely the better choice. For sleek, modern interiors with neutral or cool tones, opt for a modern finish like matte black or brushed nickel.
Coordinate with Existing Hardware
Look at the other metal elements in your home, such as light fixtures, faucets, or cabinet pulls. Coordinating finishes creates a cohesive look, but mixing metals can work if done intentionally. For example, pairing antique brass handles with brushed nickel hinges can add subtle contrast in a transitional space.
Test for Comfort and Functionality
Handles should feel good to use. Lever handles are often more ergonomic than knobs, especially for modern finishes. Test the weight and grip of the handle to ensure it’s comfortable for daily use, particularly in high-traffic areas like entryways.
Think About Maintenance
If you prefer low-maintenance options, brushed nickel or matte black may be better than antique brass, which may require occasional polishing. For busy households, durability and ease of cleaning are key considerations.
Budget Wisely
Both antique brass and modern finishes come in a range of price points. Set a budget and explore options within that range, whether it’s affordable matte black pulls or high-end antique brass knobs. Consider mixing high-impact statement handles with budget-friendly options to balance cost and style.
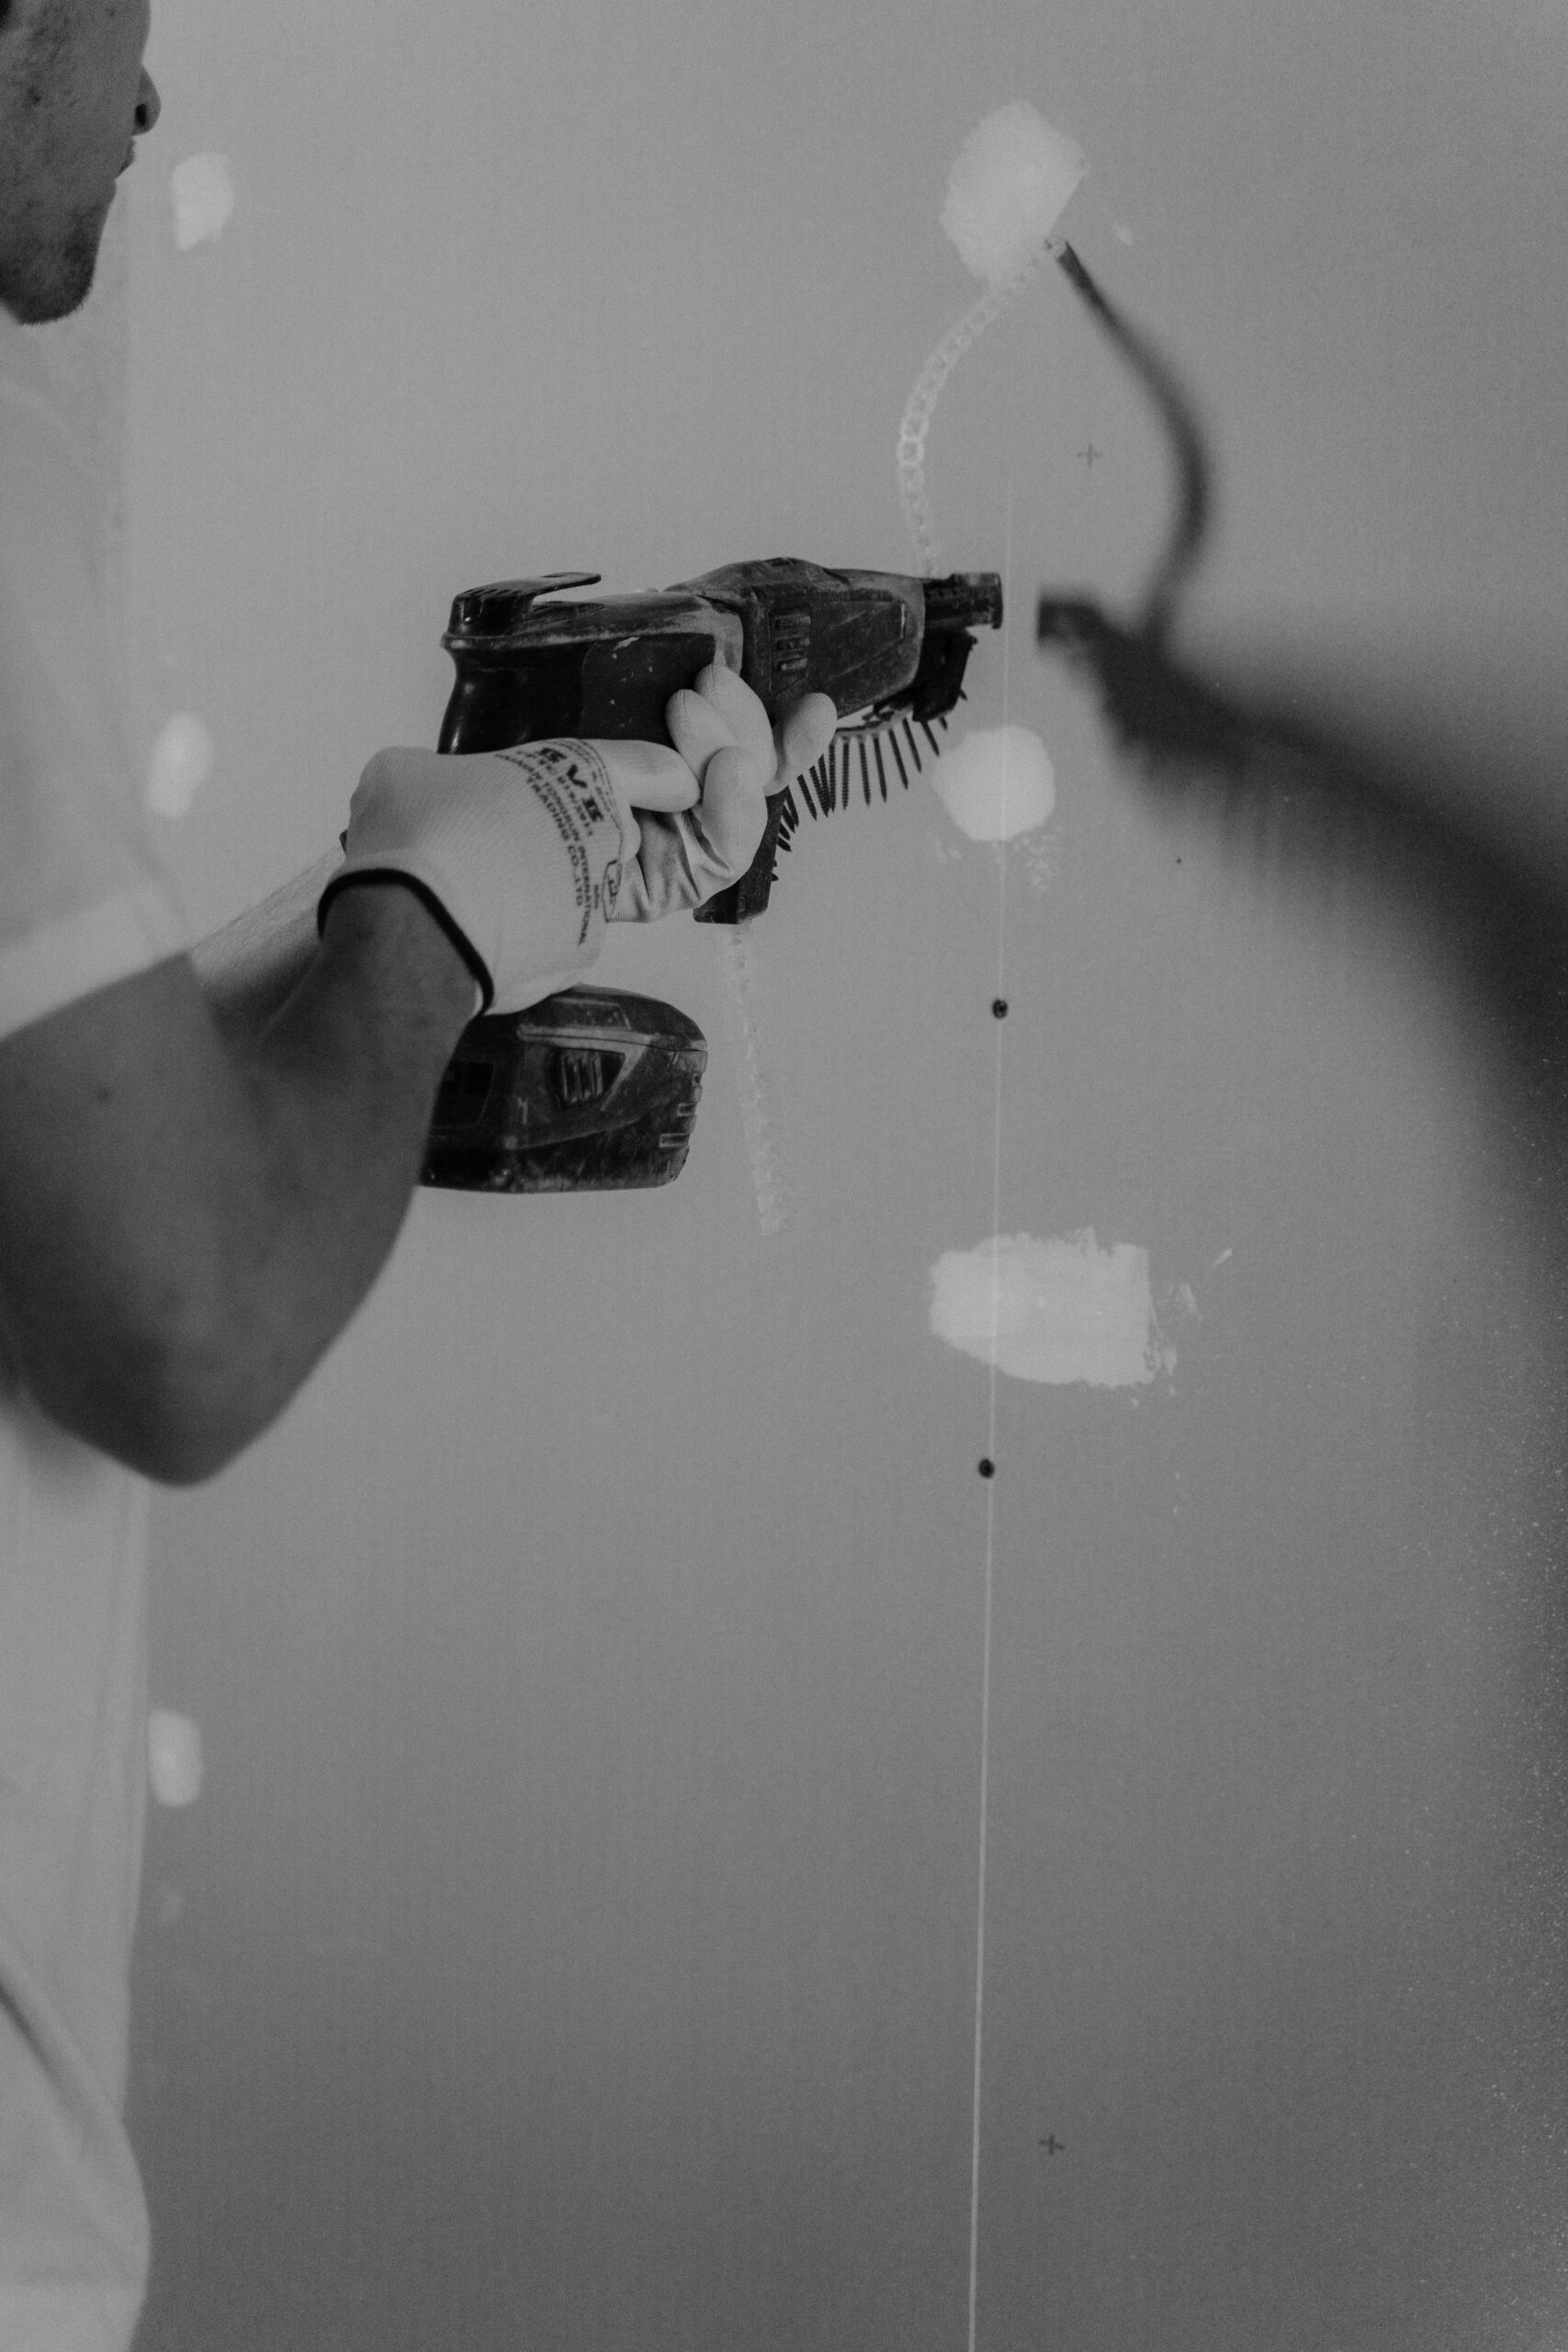
Installation Tips for a Polished Look
Once you’ve chosen your door handles, proper installation ensures they look and function their best. Here are some tips:
- Measure Precisely: Use a template to mark the placement of your handles, ensuring they’re aligned across all doors.
- Use Quality Tools: A screwdriver, drill, and level will help you install handles securely and evenly.
- Test the Mechanism: After installation, check that the handle operates smoothly and locks properly if needed.
- Maintain Consistency: Install handles at the same height and orientation for a cohesive appearance throughout your home.
If you’re not comfortable with DIY installation, hire a professional for a seamless result.
Final Thoughts: Choosing the Right Finish for Your Home
Antique brass and modern finishes each bring something special to your interiors. Antique brass offers warmth, character, and timeless appeal, making it ideal for traditional or eclectic spaces. Modern finishes like matte black, brushed nickel, or polished chrome deliver sleek sophistication, perfect for contemporary or minimalist homes. By considering your design style, practical needs, and budget, you can choose the finish that best enhances your space.
Take the time to explore different options, coordinate with existing elements, and prioritize both aesthetics and functionality. Whether you choose the vintage charm of antique brass or the clean lines of a modern finish, the right door handles can elevate your interiors and make every entrance a reflection of your personal style.
Don’t miss our featured post—handpicked for impact and value.

Cuticle work is where shape matters most. KVADRO’s cuticle nail drill bits collection currently shows 53 bits, and the category is dominated by diamond bits in flame, ball, drop, cone, and needle forms. That alone tells you there is no single “best cuticle bit” for every step. Some shapes are better for lifting, some for cleaning the бокові валики, and some for polishing away dead skin after the cuticle is already opened.
How to Choose the Best Drill Bit for Cuticle Cleaning
For opening and lifting the cuticle zone, a flame-style bit is usually the classic starting point. The DIAMOND NAIL DRILL BIT, “FLAME”, RED, HEAD DIAMETER 2.3/10MM (FA10R023/10) – STALEKS™ is listed for processing lateral nail folds, cracks, and calluses, while the STALEKS – Diamond nail drill bit DUO “Pointed Flame” blue-green, 2,1/8mm is specifically described for cuticles, lateral folds, and detachments, with medium-hard abrasiveness suitable for both novice and expert specialists. That makes flame bits one of the strongest answers to the best drill bit for cuticle cleaning.
Which Cuticle Bits Work Best After the Cuticle Is Lifted
Once the cuticle is lifted, many techs switch to a ball or bud shape for cleaner finishing. The DIAMOND NAIL DRILL BIT, “BALL”, BLUE, HEAD DIAMETER 2.5MM (FA01B025) – STALEKS™ is listed for cuticle removing, opening lateral folds, and dead skin elimination. The DIAMOND NAIL DRILL BIT, “BUD”, RED, HEAD DIAMETER 1.8/4MM (FA60R018/4) – STALEKS™ is described for delicate cuticle removal and rough skin around the lateral folds. In practice, that means the ball is great for finishing and polishing, while the bud gives a softer, more delicate touch in tighter areas.
What Makes the Best Nail Drill Bit for Cuticles Safe to Use
Safety in cuticle work comes from shape, grit, and control, not from using the sharpest-looking bit. The DIAMOND NAIL DRILL BIT, “DUO CONE”, BLUE-GREEN, HEAD DIAMETER 2,5/8MM (FA70BG025/8) – STALEKS™ is one example of a bit designed for lifting the cuticle, processing lateral folds, removing pterygium, and polishing before extension. Meanwhile, rounded cylinder and needle shapes on KVADRO are positioned for cuticle work, rough skin cleanup, and sidewall processing, which shows why the best nail drill bit for cuticles is usually part of a sequence rather than a single magic bit.
- Use a flame or cone shape to lift and open the cuticle area.
- Use a ball or bud to refine and remove leftover dead skin.
- Stay with fine or medium abrasiveness until your control is consistent.
So, the best cuticle drill bit is not one universal shape. For most nail techs, the best setup is a flame for opening, a ball for finishing, and a bud or cone for detail work. KVADRO’s Staleks and diamond-bit assortment supports that workflow especially well.

When heating or cooling systems stop working properly, homeowners quickly realise how important reliable technical support can be HVAC Contractors. Air conditioning failures in hot climates or heating problems during cooler seasons can disrupt comfort and even affect health. Because HVAC systems are complex, choosing the right contractor is crucial.
Many homeowners naturally search for an HVAC contractor near Everglades City, FL when they need installation, repairs, or maintenance. Working with local professionals offers several advantages that national chains or distant providers often cannot match. Local HVAC contractors bring regional knowledge, faster response times, and personalised service that directly benefits homeowners.
1. Faster Response Times and Emergency Support
Local HVAC contractors are usually located within the same community or nearby service area. Because of this proximity, they can respond quickly when emergencies arise. HVAC issues rarely occur at convenient times, and repair delays can cause significant discomfort.
For example, a malfunctioning air conditioner during peak summer temperatures can make indoor spaces difficult to inhabit. Local contractors understand the urgency and can often provide same-day service or rapid dispatch.
Key advantages of faster response:
- Reduced downtime for heating or cooling systems
- Quicker diagnosis and repair of HVAC faults
- Emergency support during extreme weather conditions
- Less stress for homeowners facing urgent repairs
Choosing an HVAC contractor near Everglades City, FL ensures technicians can reach your property faster than companies based in distant cities.
2. Deep Understanding of Local Climate Conditions
One of the most overlooked advantages of hiring local HVAC professionals is their knowledge of regional climate patterns. HVAC systems must perform differently depending on temperature, humidity, and seasonal changes.
Everglades City and surrounding areas experience high humidity, intense summer heat, and coastal environmental conditions. These factors influence which HVAC systems perform best and how they should be maintained.
Local contractors understand:
- Typical temperature fluctuations in the region
- Humidity control requirements
- Salt air effects on outdoor HVAC equipment
- Energy-efficient cooling strategies for coastal climates
Because of this knowledge, a trusted HVAC contractor near Everglades City, FL can recommend systems specifically suited to the environment rather than relying on generic equipment recommendations.
3. Personalised Customer Service and Community Trust
Local HVAC businesses depend heavily on their reputation within the community. Unlike large national providers, their success often comes from word-of-mouth referrals and long-term customer relationships.
As a result, local contractors tend to prioritise:
- Transparent pricing
- Honest system recommendations
- Reliable scheduling
- Ongoing customer support
Homeowners often find that local companies take extra time to explain HVAC problems clearly and recommend practical solutions.
Reasons personalised service matters
- Builds trust between contractors and homeowners
- Improves communication during repairs or installations
- Encourages long-term maintenance relationships
- Ensures customers receive tailored solutions
When searching for an HVAC contractor near Everglades City, FL, homeowners often benefit from the familiarity and reliability of businesses that serve their own community.
4. Knowledge of Local Building Codes and Regulations
HVAC installation and maintenance must follow specific building codes, safety regulations, and permitting requirements. These regulations can vary between regions and municipalities.
Local contractors stay updated on:
- Regional HVAC installation standards
- Local energy efficiency requirements
- Permit regulations for system replacements
- Safety codes for ventilation and ductwork
This expertise ensures that HVAC installations are fully compliant with local regulations, reducing the risk of costly modifications later.
Benefits of regulatory knowledge
- Avoids permit violations or inspection failures
- Ensures HVAC systems meet local safety standards
- Supports energy efficiency compliance
- Simplifies the installation process
Hiring an experienced HVAC contractor near Everglades City, FL helps homeowners avoid complications that can arise when contractors are unfamiliar with local building rules.
5. Better Long-Term Maintenance and Support
HVAC systems require regular maintenance to perform efficiently and extend their lifespan. Filters must be replaced, components inspected, and systems cleaned periodically.
Local contractors can offer ongoing service agreements and seasonal maintenance programs tailored to regional conditions.
Maintenance services typically include:
- Air conditioning tune-ups
- Heating system inspections
- Air filter replacement
- Refrigerant level checks
- Duct system evaluations
Because they operate nearby, local technicians can schedule routine inspections and preventative maintenance without long waiting times.
Working with a reliable HVAC contractor near Everglades City, FL also makes it easier to build an ongoing service relationship that keeps systems running efficiently for years.
6. Supporting the Local Economy and Community
Hiring local contractors contributes directly to the local economy. When homeowners choose local businesses, they help support jobs, small enterprises, and community growth.
Local HVAC companies often collaborate with other nearby suppliers, service providers, and contractors. This creates a network of businesses that strengthens the regional economy.
Community benefits of hiring local contractors
- Supports small local businesses
- Creates local employment opportunities
- Encourages community development
- Keeps money circulating within the local economy
Additionally, local contractors often participate in community events, sponsorships, or neighbourhood initiatives. Choosing an HVAC contractor near Everglades City, FL can therefore benefit both homeowners and the wider community.
Conclusion:
Heating and cooling systems play a vital role in maintaining comfortable indoor environments. When problems arise or upgrades are needed, choosing the right HVAC professional makes a significant difference.
Local contractors offer several advantages that larger or distant providers often cannot match. Their quick response times, understanding of regional climate conditions, knowledge of building codes, and commitment to customer relationships make them valuable partners for homeowners.
For residents seeking dependable service, working with an experienced HVAC contractor near Everglades City, FL ensures faster support, tailored solutions, and ongoing maintenance that keeps systems operating efficiently. By choosing local expertise, homeowners gain both reliable comfort and peace of mind.

Introduction to tiimatuvat (traditional shared living)
Imagine a world where living arrangements promote community, connection, and collaboration. A space where individuals share not just walls but experiences, meals, and moments of joy. This is the essence of tiimatuvat ancient shared living that has found its way into our modern society. As we navigate an increasingly isolated world, the principles behind tiimatuvat resonate deeply with many seeking deeper connections and more sustainable lifestyles. Let’s explore this fascinating tradition’s roots and uncover how it can transform contemporary living for the better.
History of tiimatuvat and its cultural significance
Tiimatuvat, deeply rooted in ancient traditions, reflects communal living practices that date back centuries. These shared spaces were not just about housing; they encapsulated the essence of togetherness and cooperation.
Historically, tiimatuvat catered to communities facing challenges like food scarcity or harsh climates. People banded together for survival, sharing resources and responsibilities. This interdependence fostered a strong sense of belonging.
Culturally, tiimatuvat is significant for its emphasis on relationships. It nurtured bonds between families and neighbors through collective celebrations and rituals. Such gatherings reinforced cultural identity while preserving storytelling traditions passed down generations.
As societies evolved, the concept of tiimatuvat adapted but never lost its core values of unity and collaboration. Today’s modern interpretations still echo these ancient principles as people seek meaningful connections in an increasingly fragmented world.
Benefits of tiimatuvat in today’s society
Tiimatuvat offers a refreshing alternative to conventional living arrangements. It fosters a sense of community that many people crave in today’s fast-paced world.
Shared responsibilities are one of its key benefits. When chores and tasks are distributed among residents, the burden lightens for everyone. This collaborative approach not only promotes teamwork but also strengthens bonds between individuals.
Moreover, tiimatuvat can significantly reduce living costs. By sharing expenses like rent and utilities, members can enjoy financial relief while still maintaining comfortable living conditions.
Additionally, this lifestyle encourages cultural exchange and diversity. Residents from different backgrounds bring unique perspectives and experiences into the shared space, enriching everyday life with varied traditions.
Emotional support is another invaluable aspect of tiimatuvat. Living closely with others creates an environment where individuals feel understood and supported during challenging times.
How to create a successful shared living space?
Creating a successful shared living space starts with clear communication. Set expectations early on about responsibilities, chores, and communal areas.
Next, designate private zones. Ensure everyone has their own space to retreat for relaxation or focus. This balance of privacy and community fosters harmony.
Choosing the right furniture also matters. Opt for multi-functional pieces that save space while encouraging collaboration like large dining tables for meals together or cozy lounges for movie nights.
Incorporate elements that reflect everyone’s personality. Shared artwork or plants can make the environment feel more inviting and personal.
Regular check-ins are crucial too. Schedule informal meetings to discuss any concerns and celebrate successes in your shared living experience. It’s all about maintaining a positive atmosphere where everyone feels valued and heard.
Examples of modern-day tiimatuvat communities
Across the globe, modern-day tiimatuvat communities are thriving. These spaces often blend traditional values with contemporary needs.
In Barcelona, for example, co-housing projects emphasize shared resources and common spaces. Residents collaborate on everything from gardening to organizing events. This fosters deep connections among neighbors.
Meanwhile, in Austin, Texas, eco-villages promote sustainability alongside communal living. Here, members share not just homes but also a commitment to reducing their environmental footprint through collective efforts.
Further north in Canada’s Vancouver area, intentional communities focus on inclusivity and support systems. They provide safe havens for various demographics while encouraging cultural exchange and cooperation among residents.
These examples illustrate how tiimatuvat principles adapt to modern life while retaining their core essence: community connection and mutual support.
Challenges and drawbacks of shared living
Shared living, while appealing, comes with its own set of challenges. One major issue is the clash of personalities. When diverse individuals share a space, differing lifestyles and habits can lead to tension.
Privacy becomes another concern. Living closely with others means fewer personal boundaries. This can be uncomfortable for those who value their alone time or need quiet spaces for work or relaxation.
Additionally, decision-making can become complicated in communal settings. Whether it’s choosing decor or managing household chores, disagreements are common.
Financial responsibilities might also create stress. While shared expenses can ease budgets, they require transparent communication to avoid misunderstandings about contributions.
There is the potential for unstable dynamics if someone decides to leave the community unexpectedly. Such changes may disrupt established routines and relationships within the group.
Conclusion: The enduring legacy of tiimatuvat in our modern world
The concept of tiimatuvat remains robust in today’s society. It serves as a testament to the enduring appeal of community living, echoing traditions that have stood the test of time. In an era marked by rapid urbanization and increasing isolation, shared living spaces offer an antidote to loneliness. They foster connections, enhance emotional well-being, and create supportive networks.
Communities built on the principles of tiimatuvat reflect our innate desire for belonging and connection. As modern housing challenges continue to rise – affordability issues, environmental concerns – these traditional models provide valuable insights into sustainable living practices.
By harnessing the wisdom from past generations while adapting it for contemporary needs, we can cultivate vibrant communities that prioritize collaboration over competition. The legacy of tiimatuvat is not merely historical; it presents a path forward where collective strength enriches individual lives.
As more people seek meaningful interactions and communal experiences, the timeless values embodied in tiimatuvat will likely inspire future generations in their quest for togetherness amidst diversity. This age-old practice may just be what we need now more than ever an invitation to reconnect with one another in profound and enriching ways.


 HOME IMPROVEMENT1 year ago
The Do’s and Don’ts of Renting Rubbish Bins for Your Next Renovation
- BUSINESS1 year ago
Exploring the Benefits of Commercial Printing

 BUSINESS1 year ago
Brand Visibility with Imprint Now and Custom Poly Mailers
- HOME IMPROVEMENT9 months ago
Get Your Grout to Gleam With These Easy-To-Follow Tips
- HEALTH9 months ago
The Surprising Benefits of Weight Loss Peptides You Need to Know
- HEALTH9 months ago
Your Guide to Shedding Pounds in the Digital Age
- TECHNOLOGY11 months ago
Dizipal 608: The Tech Revolution Redefined

 HEALTH12 months ago
Happy Hippo Kratom Reviews: Read Before You Buy!