HOME IMPROVEMENT
The Ultimate Guide to Cabinet Refacing: Everything You Need to Know
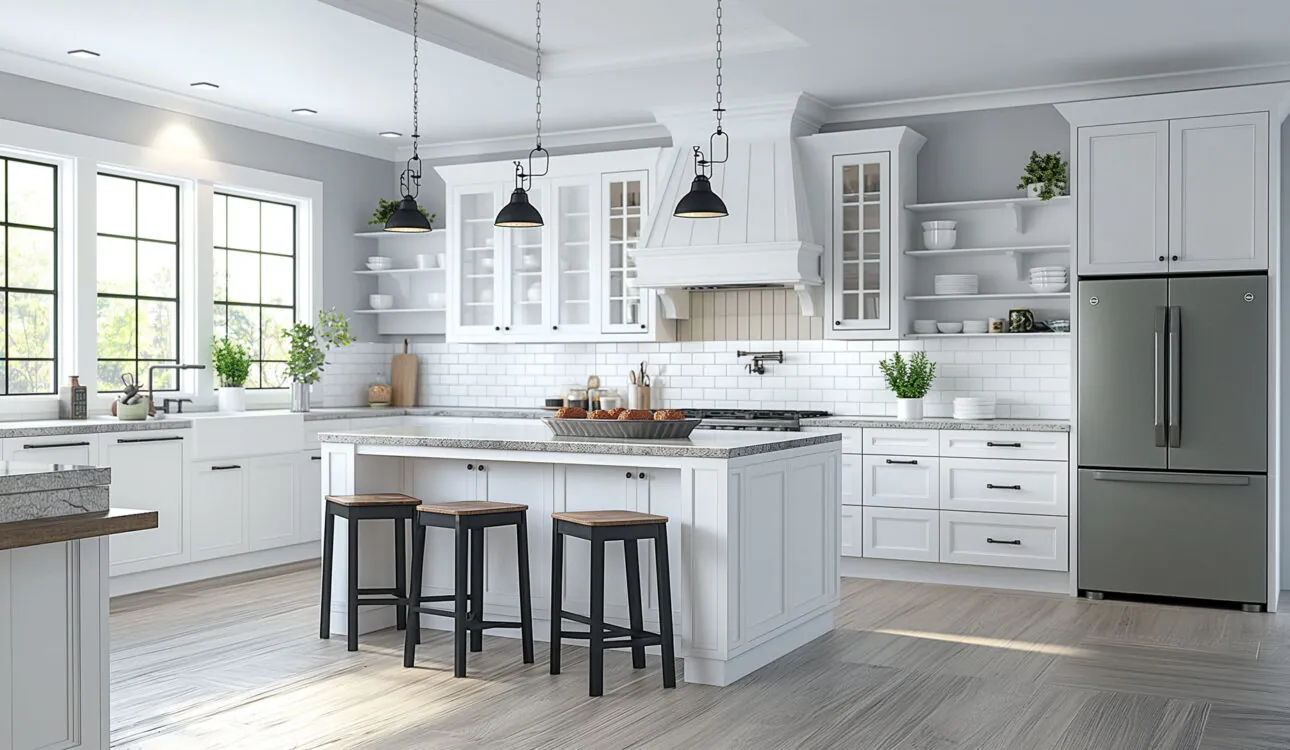
Cabinet refacing offers a cost-effective and transformative solution for updating your kitchen or bathroom without the expense and hassle of a full remodel. Unlike replacing cabinets entirely, refacing involves updating the external appearance of your cabinets while keeping the existing framework intact. We will delve into the ins and outs of cabinet refacing, covering everything from the process and materials to the benefits and potential limitations.
Understanding Cabinet Refacing
Refacing cabinets involves replacing the doors and drawer fronts, applying a new veneer to the exterior surfaces, and adding new hardware to achieve a fresh look. This process is ideal for homeowners looking to change their cabinetry’s style or color scheme without disrupting a complete tear-out and installation.
Benefits of Cabinet Refacing
One of the primary advantages of cabinet refacing in Los Angeles is its cost-effectiveness compared to total replacement. It allows homeowners to achieve a significant aesthetic upgrade at a fraction of the cost of new cabinets. Refacing is much quicker than a complete remodel, often taking days instead of weeks, which minimizes inconvenience and disruption in the home.
Materials Used in Cabinet Refacing
The materials used in cabinet refacing typically include wood veneers, laminate, or rigid thermofoil (RTF). Wood veneers offer a luxurious, natural look and can be stained or painted to match any decor. Laminate and RTF are durable and come in various colors and patterns, making them versatile options for different styles and finishes.
Process of Cabinet Refacing
The cabinet refacing process begins with carefully measuring your existing cabinets to ensure the new doors and veneers fit precisely. Next, the old doors and drawer fronts are removed, and any exposed cabinet surfaces are cleaned and prepared to apply new materials. The veneer or laminate is applied to the cabinet boxes, and new doors, drawer fronts, and updated hardware are installed.
Choosing the Right Cabinet Refacing Professional
While cabinet refacing can be a DIY project for those with experience in woodworking and home improvement, many homeowners prefer to hire professionals for a flawless finish. When choosing a refacing professional, consider their experience, portfolio of past projects, and customer reviews to ensure they can deliver the quality and style you envision for your space.
Cost Considerations
The cost of cabinet refacing can vary widely depending on factors such as the size of your kitchen, the materials chosen, and whether you hire professionals or do it yourself. On average, homeowners can expect to spend significantly less than they would for new cabinets, making refacing an attractive option for budget-conscious remodelers.
Potential Limitations and Considerations
While cabinet refacing offers many benefits, it may only suit some situations. For example, if your existing cabinets are structurally unsound or you desire a completely different layout, you may need more than refacing to achieve the desired results. Additionally, while refacing is less disruptive than a full remodel, there will still be some inconvenience during installation.
Maintenance and Longevity
Properly maintained, refaced cabinets can last for many years, providing a durable and stylish storage solution. Regular cleaning with mild soap and water, as well as avoiding harsh abrasives, can help preserve the finish of your refaced cabinets. Choosing high-quality materials and professional installation can also contribute to their longevity.
Enhancing Home Value
Beyond aesthetic improvements, cabinet refacing can also enhance the overall value of your home. Updated and well-maintained kitchen cabinets are a significant selling point for potential buyers, making your property more attractive in the real estate market. Investing in refacing is a strategic decision to increase your home’s resale value while enjoying the immediate benefits of a refreshed living space.
Environmental Considerations
Choosing cabinet refacing over full replacement also aligns with environmentally friendly practices by reducing waste. Refacing utilizes existing cabinet structures, minimizing the amount of material sent to landfills compared to completely replacing cabinets. Additionally, many refacing materials, such as wood veneers and laminates, can be sourced sustainably, further reducing the environmental footprint of your remodeling project. By opting for refacing, homeowners can contribute to a greener future while achieving their design goals.
Cabinet refacing offers a practical and cost-effective way to update the look of your kitchen or bathroom cabinets. By understanding the process, materials, costs, and potential considerations involved, homeowners can decide whether refacing is the right choice for their remodeling needs. Whether you tackle it as a DIY project or hire a professional, refacing can breathe new life into your space without the expense and disruption of a full cabinet replacement.

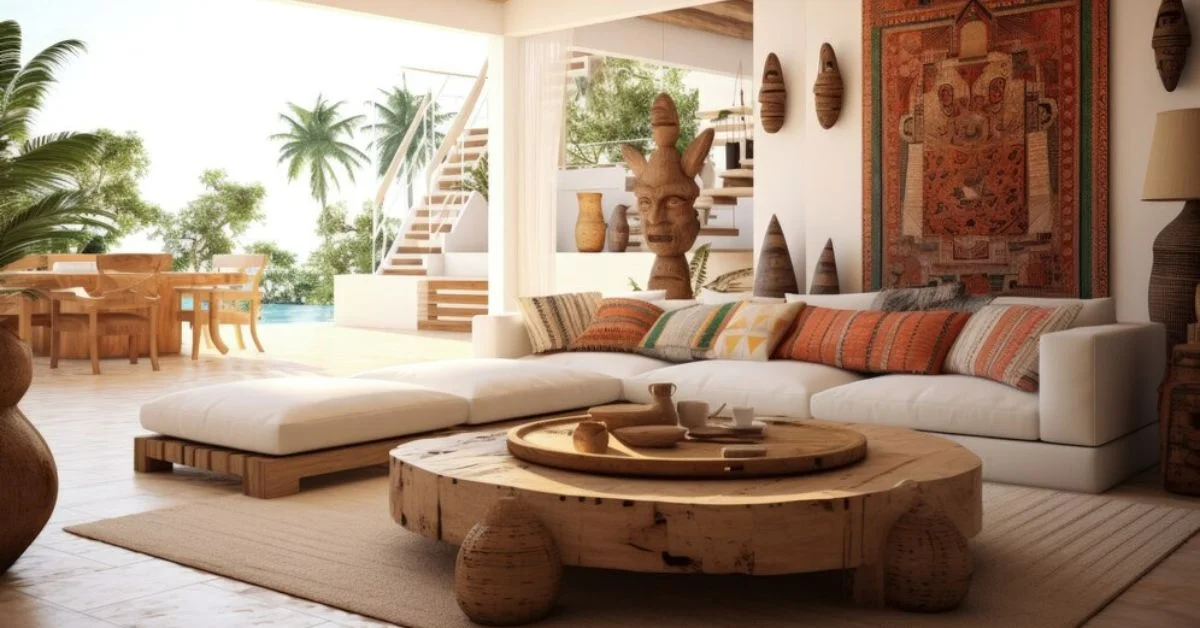
Are you dreaming of your vacation home? A place where you can escape the hustle and bustle of everyday life and relax in a tranquil, serene environment? Designing your vacation home is an exciting journey, allowing you to create a space perfectly tailored to your tastes and needs. Whether you’re envisioning a cozy mountain retreat, a breezy coastal getaway, or a rustic cabin in the woods, here are ten inspiring vacation home design ideas to help you create your perfect escape.
1. Embrace Natural Light
Incorporating natural light into your vacation home design can transform the space, making it feel bright, airy, and welcoming. Large windows, skylights, and glass doors allow natural light to flood the interior, creating a seamless connection with the surrounding landscape. Position seating areas, dining spaces, and relaxation zones to take advantage of the natural light and stunning views.
2. Create an Outdoor Oasis
Whether you own a beach house, a mountain retreat, or a lakeside cabin, maximizing the outdoor space to create an oasis will allow you to fully appreciate your vacation home’s unique location. A great way to elevate your outdoor environment and create a soothing ambiance is by incorporating a water fountain design. The sound of flowing water can instantly calm the mind and soothe the body, making it the perfect addition to your outdoor oasis.
Whether you choose a small tabletop fountain or a grand waterfall, the serene sound and beauty of the water will enhance your overall experience. Combine this with comfortable seating, inviting dining areas, and one of our favorite amenities – a hot tub or fire pit, and you’ll have a personal paradise ready for you to relax and unwind.
3. Open Floor Plan
An open floor plan can enhance the sense of space and flow in your vacation home. By combining the kitchen, living, and dining areas into one cohesive space, you can create an inviting environment that encourages socializing and relaxation. Incorporate high ceilings, exposed beams, and natural materials to add warmth and character to the interior while maintaining a sense of openness.
4. Cozy Fireplace
A cozy fireplace is a must-have feature for any vacation home, adding warmth, charm, and ambiance to the space. Whether you prefer a traditional wood-burning fireplace, a gas insert, or a modern ethanol burner, a fireplace can become the focal point of your living area. Surround the fireplace with comfortable seating, plush rugs, and built-in shelving to create a cozy nook where you can curl up with a good book or enjoy intimate conversations.
5. Rustic Charm
Embrace the rustic charm of your vacation home’s surroundings by incorporating natural materials and textures into your design. Exposed wood beams, stone accents, and reclaimed wood flooring can add warmth and character to the interior, while rustic furniture, cozy textiles, and vintage décor create a welcoming and relaxed atmosphere.
Pay homage to the local environment by incorporating design elements inspired by the surrounding landscape, such as nautical accents for a coastal retreat or log cabin-inspired details for a mountain getaway.
6. Serene Bedroom Retreats
Design serene and restful bedroom retreats where you can relax and recharge after a day of adventure. Choose a soothing color palette, luxurious bedding, and plush pillows to create a comfortable and inviting space.
Maximize storage with built-in closets, dressers, and bedside tables to keep the room clutter-free. Consider incorporating large windows or a private balcony to take advantage of the views and natural light, creating a tranquil sanctuary where you can rest and rejuvenate.
7. Gourmet Kitchen
Design a gourmet kitchen where you can unleash your inner chef and prepare delicious meals for family and friends. Opt for high-quality appliances, durable countertops, and ample storage to make cooking and entertaining a breeze.
Consider incorporating a large island or breakfast bar, providing additional workspace and seating for casual dining. Enhance the kitchen’s functionality and style with custom cabinetry, under-cabinet lighting, and stylish hardware, creating a space that’s as beautiful as it is practical.
8. Spa-Inspired Bathroom
Create a spa-inspired bathroom where you can pamper yourself and indulge in relaxation. Incorporate luxurious features such as a soaking tub, walk-in shower, and double vanity, providing the ultimate in comfort and convenience.
Choose natural materials, such as stone, marble, and wood, to create a serene and sophisticated atmosphere. Add finishing touches such as plush towels, soft lighting, and scented candles to evoke the feeling of a luxurious retreat.
9. Entertainment Zone
Design an entertainment zone where you can gather with family and friends to enjoy games, movies, and quality time together. Create a dedicated space with comfortable seating, a large-screen TV, and a selection of games and activities to keep everyone entertained. Consider incorporating a wet bar, mini-fridge, or popcorn machine to enhance the experience, providing everything you need for a fun and memorable vacation.
10. Personal Touches
Finally, don’t forget to add personal touches that reflect your unique style and personality. Whether it’s family photos, cherished artwork, or souvenirs from your travels, incorporating personal items into your vacation home design can make it feel truly special and one-of-a-kind. Take inspiration from the local culture, landscape, and architecture, infusing your vacation home with elements that speak to your passions and interests.
In Conclusion
Designing your vacation home is an exciting opportunity to create a space that reflects your lifestyle, tastes, and aspirations. By incorporating these ten inspiring design ideas, you can create the perfect getaway where you can relax, recharge, and make lasting memories with family and friends. Whether you’re seeking a cozy mountain retreat, a breezy coastal getaway, or a rustic cabin in the woods, let these ideas inspire you to create your dream vacation home.
The mind often flits between paint, décor, and furniture when considering home beautification. Yet, many overlook the foundational aspect of our living spaces—the floor. That’s where Carpet Now enters the scene, seamlessly weaving the tale of high-quality, beautiful carpet that adorns a space and amplifies it.
The Essence of High-Quality Carpets
While it might be tempting to grab any carpet that matches your home’s color scheme, the real value lies in choosing a premium-quality carpet. The difference between an ordinary rug and a high-quality, beautiful carpet from carefully curated collections from Carpet Now is like comparing a regular print to a masterpiece.
1. Longevity: High-quality carpets tend to last longer, resisting wear and tear even in high-traffic areas.
2. Aesthetic Appeal: There’s an unmistakable charm in a beautifully designed, high-quality carpet. It speaks of taste, refinement, and an appreciation for the finer things.
3. Comfort: Quality carpets don’t just look good; they feel divine. The plush texture underfoot can transform an ordinary room into a cozy haven.
The Carpet Now Difference
While quality and design are paramount, the buying experience is equally crucial. Carpet Now has innovated buying by bringing the showroom directly to your home. Imagine not having to step out but instead being presented with a vast array of options in your living room! You get to touch, feel, and visualize every option where it’ll reside. This personalized approach ensures that customers are equipped with all the necessary insights to make an informed choice, all from the comfort of their homes. That’s the Carpet Now difference.
Understand the Underlay
The underlay is a crucial aspect that often goes overlooked in the carpet world. A high-quality, beautiful carpet is not just about the surface we see and feel; it’s equally about what lies beneath. The right underlay can:
- Enhance the carpet’s feel
- Increase sound insulation
- Improve thermal insulation
So, when you think of investing in a quality carpet, remember the foundation upon which it will lay. Your installer will guide you through your many options and recommend what they believe to be the best choice.
Design Matters
While the quality of a carpet is pivotal, its design can make or break a room’s aesthetic. For instance, the myriad patterns, colors, and textures available from Carpet Now showcase the artistry behind every weave.
Here’s a tip: When selecting a design, consider the size of the room, existing décor, and the purpose of the space. A playful pattern might suit a child’s room, while a more muted, elegant design might be apt for a study.
Eco-Conscious Choices
In today’s age, sustainability is not just a buzzword; it’s a responsibility. High-quality carpets, including those from Carpet Now, often come with eco-friendly credentials. Made from sustainable materials, using processes with minimal carbon footprint, these carpets let homeowners make a green choice without compromising luxury.
The Joy of a Carpeted Haven
From the iconic films of yesteryears to contemporary chic homes, carpets have always played a significant role in setting the scene. Their transformative power, especially when high in quality and beauty, is undebatable. Next time you consider upgrading your home, remember a carpet’s silent yet potent impact. Let Carpet Now be your guiding light as you unfurl beauty, one weave at a time. In doing so, you aren’t just choosing décor; you’re opting for an enhanced living experience.
Recessed lighting, an increasingly popular choice among homeowners, offers a sleek, streamlined look while providing efficient illumination to any space. Understanding the nuances of quality recessed lighting services is crucial in transforming the ambiance of your home. In this editorial, we delve into recessed lighting services, using iConduit Electric as a prime example of exemplary service.
What is Recessed Lighting?
Recessed lighting, often called can lights or downlights, involves light fixtures installed into hollow openings in the ceiling. This type of lighting is known for its ability to create a minimalistic yet elegant aesthetic. Quality recessed lighting services ensure these fixtures are seamlessly integrated with your ceiling, providing a clean, unobtrusive look.
Why Choose Recessed Lighting?
- Versatility: Recessed lights can be used in various rooms, from kitchens to basements, adapting to different lighting needs. They are particularly effective in highlighting artwork or architectural features, adding a dramatic touch to your décor.
- Space Enhancement: They help create the illusion of more space, making them ideal for rooms with lower ceilings. This is particularly beneficial in urban homes where maximizing space is key.
- Energy Efficiency: Many recessed lighting options are compatible with LED bulbs, which consume less energy and last longer. This reduces your carbon footprint and cuts down on electricity bills.
- Customizability: With a range of bulb types, intensities, and color temperatures available, recessed lighting can be tailored to suit any mood or ambiance. Whether you need bright light for a workspace or a soft glow for relaxation, there’s a configuration that fits your needs.
- Safety and Cleanliness: Unlike hanging fixtures, recessed lights are less prone to accumulate dust and are out of reach for children, making them a safer and cleaner option in homes with young families.
Recessed Lighting Services Niles: What to Look For
When seeking recessed lighting services in Niles or similar areas, looking for providers who understand the nuances of local architecture and interior design trends is crucial. A service like iConduit Electric, renowned for its expertise, can offer invaluable insights into selecting and installing the right recessed lighting for your space.
The Installation Process
Quality recessed lighting services involve several key steps:
1. Planning and Design: This includes deciding the number of lights, their placement, and the type of bulbs.
2. Electrical Work: Safe and efficient wiring is crucial. Professionals ensure that the electrical work complies with local codes.
3. Installation: The actual fitting of the lights into the ceiling requires precision and care to avoid damage.
DIY vs. Professional Installation
While some may consider DIY installations to save costs, professional installation ensures safety, efficiency, and optimal aesthetic results. Companies like iConduit Electric provide peace of mind with their expertise and experience. It’s also important to periodically review the alignment and functionality of the lights to ensure they continue to enhance your space as intended.
Maintenance and Upkeep
Quality recessed lighting services don’t end at installation. Regular maintenance is essential to ensure longevity and optimal performance. This includes cleaning, bulb replacement, and occasional check-ups by professionals.
Lighting the Way Forward
Quality recessed lighting services, such as those provided by iConduit Electric, offer more than just illumination. They bring style, functionality, and efficiency to your home. Whether you’re in Niles or elsewhere, investing in professional recessed lighting services is a bright decision for any homeowner.


 TECHNOLOGY4 months ago
Blog Arcy Art: Where Architecture Meets Art

 ENTERTAINMENT2 weeks ago
Exploring the Kristen Archives: A Treasure Trove of Erotica and More
- LIFESTYLE4 months ago
The Disciplinary Wives Club: Spanking for Love, Not Punishment
- LIFESTYLE2 weeks ago
Who Is Sandra Orlow?
- GENERAL3 days ago
5 Factors That Affect Tattoo Removal Success
- ENTERTAINMENT8 months ago
Yuppow: Your Free Source for Movies and TV Shows
- ENTERTAINMENT1 week ago
Kiss KH: The Streaming Platform Redefining Digital Engagement and Cultural Currents
- HOME IMPROVEMENT5 days ago
Get Your Grout to Gleam With These Easy-To-Follow Tips