APPS & SOFTWARE
How to Send 100GB File Free: Top Solutions and Tips

Step-by-Step Guide to Send 100GB File Free Online
Transferring large files online can be a daunting task, but it’s essential in our data-driven world. Whether you’re sharing media files, software, or large datasets, finding a reliable way to send a 100GB file for free is crucial. This guide will walk you through the best solutions and provide helpful tips to make the process smooth and efficient.
When you’re looking to send a 100GB file free, there are several methods to consider. Here’s a detailed, step-by-step guide to help you navigate your options:
Different Sizes for A File You Should Know [MB/GB/TB/PB]
Understanding file sizes is fundamental to managing and transferring data effectively:
- MB (Megabyte): 1 MB = 1,024 KB (Kilobytes)
- GB (Gigabyte): 1 GB = 1,024 MB
- TB (Terabyte): 1 TB = 1,024 GB
- PB (Petabyte): 1 PB = 1,024 TB
How to Send 100MB File Free
Sending a 100MB file is relatively simple and can be done using several free online services:
- Email Attachments: Most email providers support attachments up to 25MB per email, but services like Gmail and Yahoo Mail can handle larger files through cloud integration.
- File Transfer Services: Websites like WeTransfer, SendGB, and TransferNow allow free transfers of files up to 2GB without needing an account.
How to Send 100GB File Free
Sending a 100GB file requires solutions that are more robust. Here are some of the best methods:
Method 1: Use Cloud Storage Services
Cloud storage services offer an efficient way to transfer large files. Here are a few options:
- Google Drive: With a free account, you get 15GB of storage, but you can upgrade for more space. Google Drive allows you to share files by generating a link.
- Dropbox: Offers 2GB of free storage, but upgrading to a paid plan can give you the necessary space for large files. Dropbox also provides shareable links.
- OneDrive: Microsoft’s OneDrive gives you 5GB for free, with paid plans available for more storage. Files can be shared with links or direct email invites.
Method 2: Use Raysync Cloud [Free Trial Up to 30GB]
Raysync offers a specialized solution for large file transfers with a free trial that allows up to 30GB of data transfer. Here’s how to use it:
- Sign Up: Create a free account on the Raysync website.
- Upload Files: Use their interface to upload your files.
- Generate Link: Once uploaded, generate a shareable link.
- Share: Send the link to your recipient for them to download the file.
How to Send 100TB File Free
Sending a 100TB file for free is currently not feasible with public tools due to the sheer size and storage costs involved. However, specialized services and enterprise solutions can handle such transfers for a fee.
Here’s a guide on how to send a 100TB file with Raysync:
Step 1: Contact Raysync Sales: Sending a 100TB file requires special considerations.
Step 2: Prepare Your File: Ensure your 100TB file is properly organized and compressed (if possible) to optimize transfer efficiency.
Step 3: Internet Connection: A stable and high-bandwidth internet connection is crucial for transferring such a large file.
In conclusion, while Raysync can handle large file transfers, sending a 100TB file requires careful planning and consultation with their sales team. They can advise on the most efficient and secure method for your specific needs.
How to Send 100PB File Free
Sending a 100PB file for free is beyond the capabilities of current online services. Such large data transfers typically require physical data transfer solutions, such as shipping hard drives, or using high-capacity, high-cost data transfer services.
Sending a 100 petabyte (PB) file with Raysync is unlikely to be feasible due to the sheer size of the data. Here’s why:
Storage Limitations: Even the most robust cloud storage solutions have limitations in terms of storage capacity. 100PB is a massive amount of data, exceeding what most standard cloud storage plans offer.
Transfer Speeds: Uploading and downloading such a large file would take an extremely long time, even with the fastest internet connections available. The transfer time could potentially stretch into years.
Technical Challenges: Managing and transferring a 100PB file presents significant technical challenges. Maintaining stable connections, handling potential data corruption, and ensuring security throughout the process would be extremely complex.
It’s highly recommended to consult with Raysync’s sales team to discuss your specific needs and explore alternative solutions for managing such a large data volume. They can provide insights into potential approaches and connect you with resources best suited to handle your situation.
The End
Transferring large files, such as a 100GB file, can be challenging, but there are free solutions available to help you manage the task efficiently. By leveraging cloud storage services and specialized file transfer tools like Raysync, you can ensure your large files are sent securely and without hassle.

In today’s interconnected world, language barriers are no longer a hindrance thanks to advancements in technology. One such innovation that has revolutionized the way we communicate across languages is Trasñator. In this article, we delve into the intricacies of Trasñator, exploring its history, functionality, applications, and future trends.
Introduction to Trasñator
Trasñator is a cutting-edge language translation tool designed to facilitate seamless communication across diverse linguistic landscapes. It employs state-of-the-art algorithms and artificial intelligence to translate text from one language to another with remarkable accuracy and efficiency.
History and Evolution
Early Beginnings
The concept of automated translation dates back to the mid-20th century when researchers began exploring ways to utilize computers for language translation tasks. Early attempts relied on rudimentary rules-based systems and lacked the sophistication of modern translation tools.
Technological Advancements
Over the years, advancements in computational linguistics, machine learning, and neural networks have propelled the evolution of translation technology. Trasñators represents the culmination of decades of research and development in the field of natural language processing.
How Trasñator Works
Trasñator operates on a complex framework that analyzes input text, identifies linguistic patterns, and generates accurate translations. Its functionality can be broken down into several key components:
Core Functionality
At its core, Trasñators utilizes machine learning algorithms to understand the structure and semantics of text, enabling it to produce contextually relevant translations.
Language Recognition
Trasñators boasts robust language recognition capabilities, allowing it to identify the source language of the input text automatically.
Translation Process
The translation process involves parsing the input text, generating a corresponding representation in the target language, and refining the output to ensure grammatical correctness and semantic coherence.
Key Features and Benefits
Trasñator offers a host of features and benefits that make it a preferred choice for individuals and businesses alike:
Multilingual Support
Trasñator supports a wide range of languages, enabling users to translate text seamlessly across linguistic boundaries.
Accuracy and Precision
With its advanced algorithms and neural network models, Trasñators delivers translations that are highly accurate and faithful to the original meaning.
Ease of Use
Trasñator’s user-friendly interface makes it accessible to users of all proficiency levels, allowing for effortless translation with just a few clicks.
Applications of Trasñator
Trasñator finds applications in various domains, including:
Personal Use
Individuals use Trasñator to translate text for personal communication, travel, and language learning purposes.
Business and Professional Use
Businesses leverage Trasñators for document translation, international communication, and localization of content for global audiences.
Comparison with Other Translation Tools
Strengths and Weaknesses
Trasñator’s strengths lie in its accuracy, multilingual support, and user-friendly interface. However, it may struggle with complex linguistic nuances and idiomatic expressions.
Unique Selling Points
What sets Trasñators apart is its ability to adapt to evolving language trends and its commitment to continuous improvement through feedback and user data analysis.
Challenges and Limitations
Despite its advancements, Trasñator faces certain challenges and limitations:
Linguistic Nuances
Translating idiomatic expressions, cultural references, and nuanced language poses challenges for automated translation systems like Trasñators.
Contextual Understanding
Trasñator may struggle to grasp the context of ambiguous phrases or sentences, leading to inaccuracies in translation.
Future Trends and Developments
Looking ahead, the future of Trasñators is marked by:
AI Integration
Further integration of artificial intelligence and machine learning techniques promises to enhance Trasñator’s performance and accuracy.
Enhanced Performance
Continued research and development efforts aim to address existing limitations and improve Trasñator’s ability to handle complex linguistic tasks.
Conclusion
In conclusion, Trasñator represents a significant milestone in the realm of language translation technology. Its advanced features, multilingual support, and ease of use make it an indispensable tool for bridging linguistic divides in our increasingly globalized world.
FAQs
Is Trasñator free to use?
Trasñators offers both free and premium subscription plans, with the latter providing access to advanced features and higher translation limits.
Can Trasñator translate audio or video files?
Trasñators primarily focuses on text-based translation and does not support direct translation of audio or video content. However, users can transcribe the audio content and then translate the text.
How accurate is Trasñator compared to human translators?
While Trasñators delivers impressive accuracy, it may not match the nuanced understanding and contextual interpretation capabilities of human translators, especially in specialized fields or creative content.
Does Trasñator offer real-time translation during conversations?
Trasñators offers a text-based translation interface and does not support real-time speech translation. However, users can type or paste text for instant translation.
Is Trasñator compatible with all devices and platforms?
Trasñators is accessible via web browsers and mobile apps, making it compatible with a wide range of devices and platforms.
Digital video files sometimes get corrupted due to reasons like incomplete downloads, hardware issues, software errors, improper handling, etc. When your cherished video files get corrupted, you need to apply proper corrupted video file repair methods to restore your original video content. Luckily, there are several video repair methods available that you can try to repair corrupted video files on your Windows system without needing professional help.
In this comprehensive guide, we will explore some DIY methods to help you learn how to repair corrupted video files on Widows. Just go with these methods one by one to repair your video file and also consider the preventive measures mentioned in this article to avoid such problems in the future.
Why Video Files Get Corrupted on Windows?
Before you apply methods to fix corrupted video files on your Windows device, it is important to find the exact reason for this corruption. Here are some common reasons why video files may get corrupted on Windows:
- Incomplete Downloads: Interrupted or incomplete downloads of video files can cause corruption as essential data may be missing or incomplete.
- Software Errors: There may be problems with your video player software or codecs, which can cause errors during playback, resulting in corrupt or damaged video files.
- Hardware Problems: Faulty hardware components, including hard drives or memory cards, can corrupt stored content, including your video files.
- Power Outages: Sudden power failures or improper shutdowns of your Windows device while working with video files can corrupt/damage the data due to incomplete writing or saving processes.
- Virus or Malware: Viruses or malware infections on your Windows system can damage video files, causing corruption or inaccessibility.
Whatever is the cause of corrupt video files, you need to use a professional video repair software or apply manual methods (which we will discuss in the following section) to repair your corrupted video files
How do I Repair Corrupted Video Files on Windows PC Using Video Repair Tool?
If you are looking for a quick and easy method to repair corrupted video, then you can use a professional video repair tool. Stellar Repair for Video is an all-in-one video repairing software which allows you to repair video files corrupted due to multiple reasons. You can fix your videos corrupted or damaged due to incomplete downloads, hardware issues, software errors, and virus infections.
You can use the Stellar Repair for Video tool to repair corrupted videos stored on multiple devices, including external hard drives, USB flash drives, SD cards, and many more. The software is known for several amazing features, which include:
- The software supports repairing corrupt or unplayable video files of multiple file formats, including MP4, MOV, AVI, MKV, ASF, WMV, M4V, 3G2, 3GP, and many more.
- It provides “Advanced Repair” option for easy repairing of severely corrupt videos.
- Allow you to preview the repaired video file before saving it on your device.
- Fix corrupt videos shot from popular camera brands, such as Canon, Nikon, Sony, etc. along with mobile phones and other devices.
- This video repair software is available in multiple versions, check their features and select the one that best suits your requirements.
Here’s how to repair corrupted video files on Windows using the Stellar Repair for Video tool:
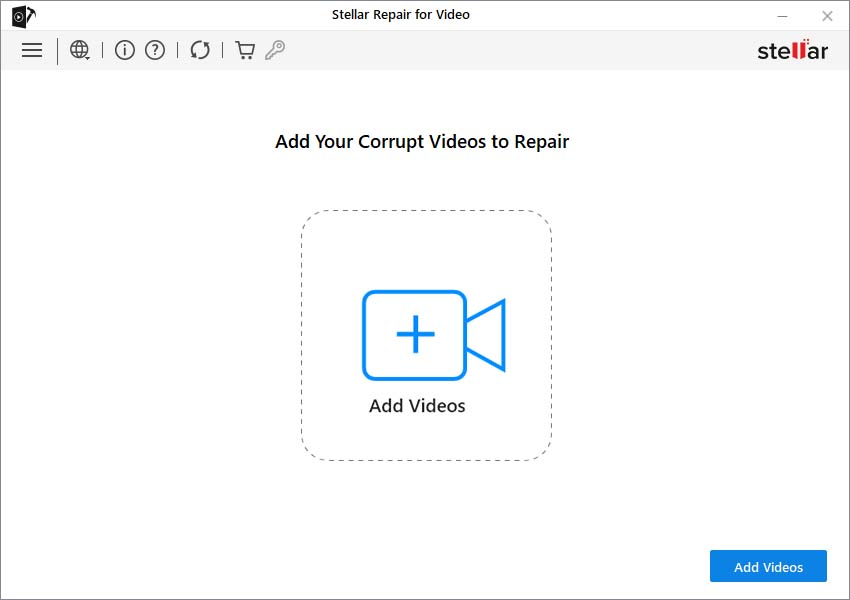
Step 1: Download and install the Stellar Repair for Video tool on your Windows device. Launch the software and from the homepage, click Add Videos and upload the videos that you need to repair.
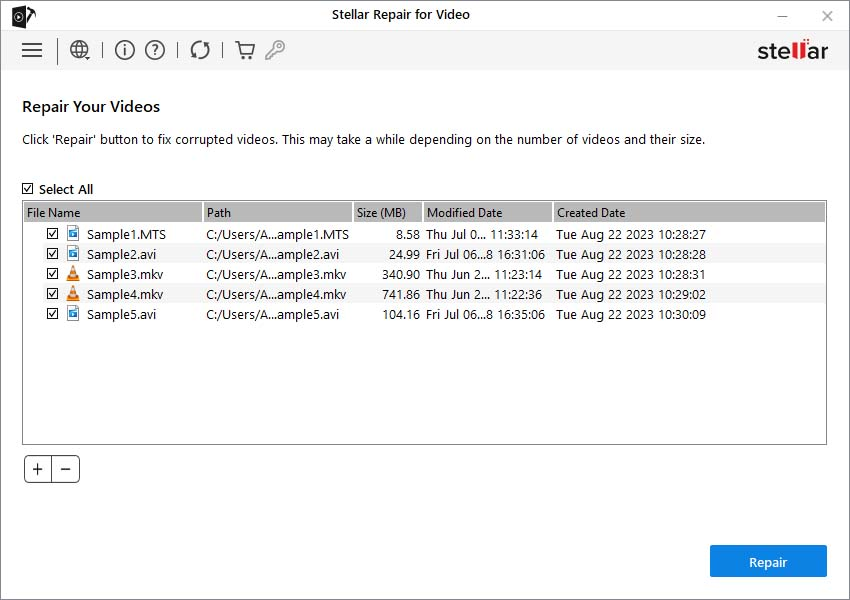
Step 2: Now, click Repair to start the repairing process. Wait till the process gets completed.
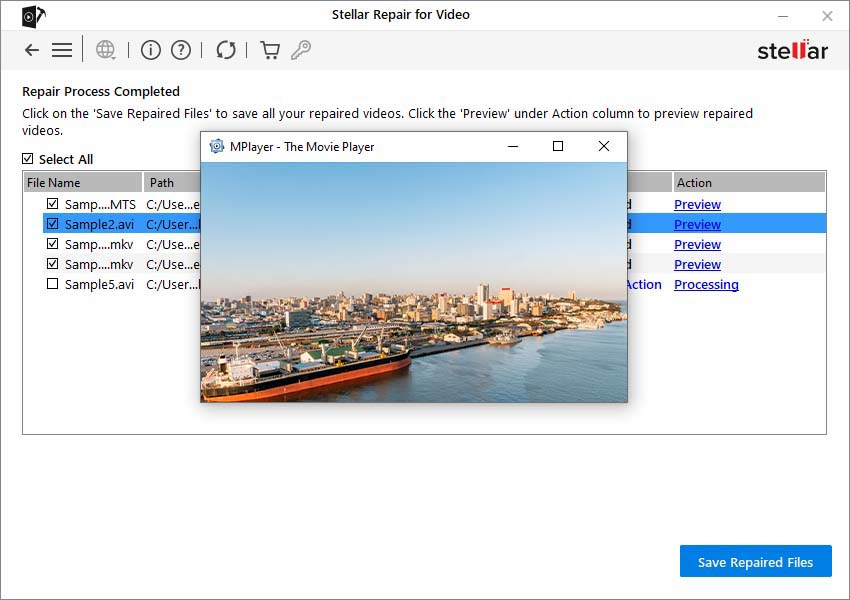
Step 3: Once the repair is completed, all the repaired files will appear on your screen. Preview the repaired videos and select the ones that you need to recover. Lastly, click the Save Repaired Files button to save selected files at the desired location.
Other Alternatives to Repair Corrupted Video Files on Windows Using VLC Player
Along with the above-mentioned steps to repair corrupt video files using a professional video repair software, you can also try other alternatives. You can use Windows built-in VLC media player tool to repair corrupted videos in multiple ways. Let’s explore these methods in detail:
Method 01: Transcode Corrupt Video Files Using VLC Media Player
You can transcode your corrupt videos using VLC player to make them playable on unsupported media players. This method best suits to fix video files corrupted or damaged due to incompatible or missing codecs. Go through the following corrupted video file repair steps to repair your video files by transcoding them:
- Launch the VLC media player and go to Media > Convert/Save.
- Click Add to upload the corrupted video file that you need to transcode.
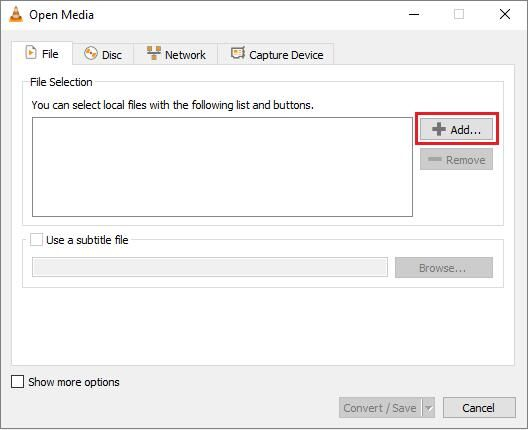
- Now, click Convert/Save. In the Covert window, enter a file name and location next to the Destination file option.
- Choose the desired input codec from the Profile list. Also, tap the Edit Selected Profile button to change the specified profile settings.
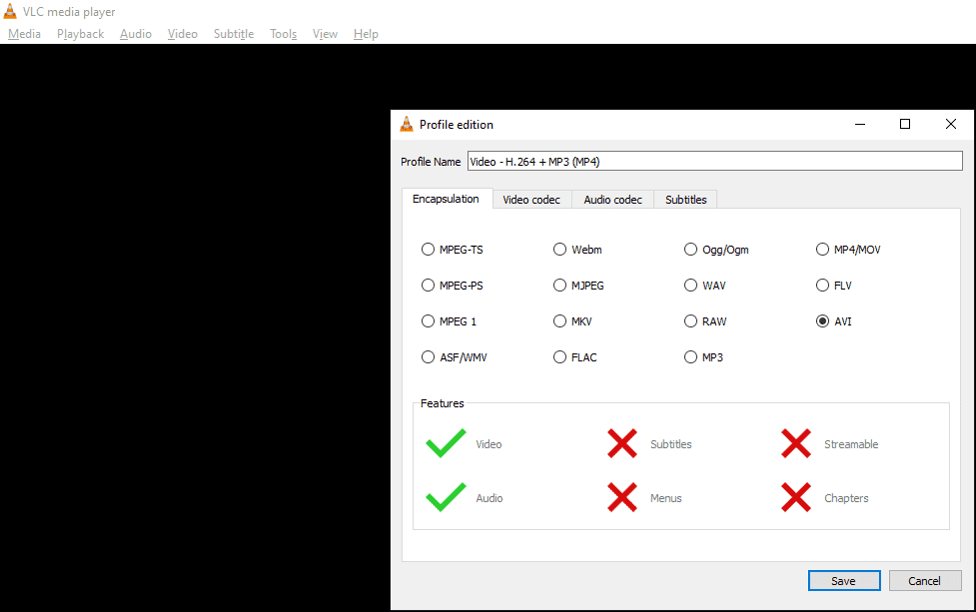
- Lastly, click the Start button in the conversion window to begin the transcoding process.
Method 02: Increase the Cache Values in VLC
Increasing cache values in VLC allows you to adjust the buffer size allocated to store data temporarily during playback. This prevents interruptions by providing a smoother streaming experience.
Higher cache values provide more buffer space, reducing the playback disruptions which usually occur due to network fluctuations. Go through the below-given steps to repair corrupted video by increasing its Cache value:
- Open VLC Player, and go to Tools > Preferences.
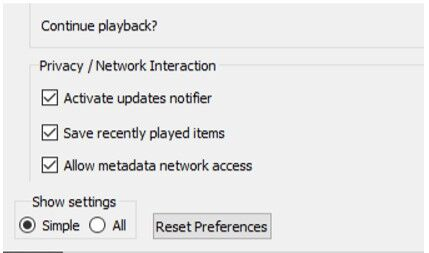
- Scroll down and in the Show Settings section, select the All option.
- Now, click on Input/Codecs. From the right navigation pane, go to the Advanced section.
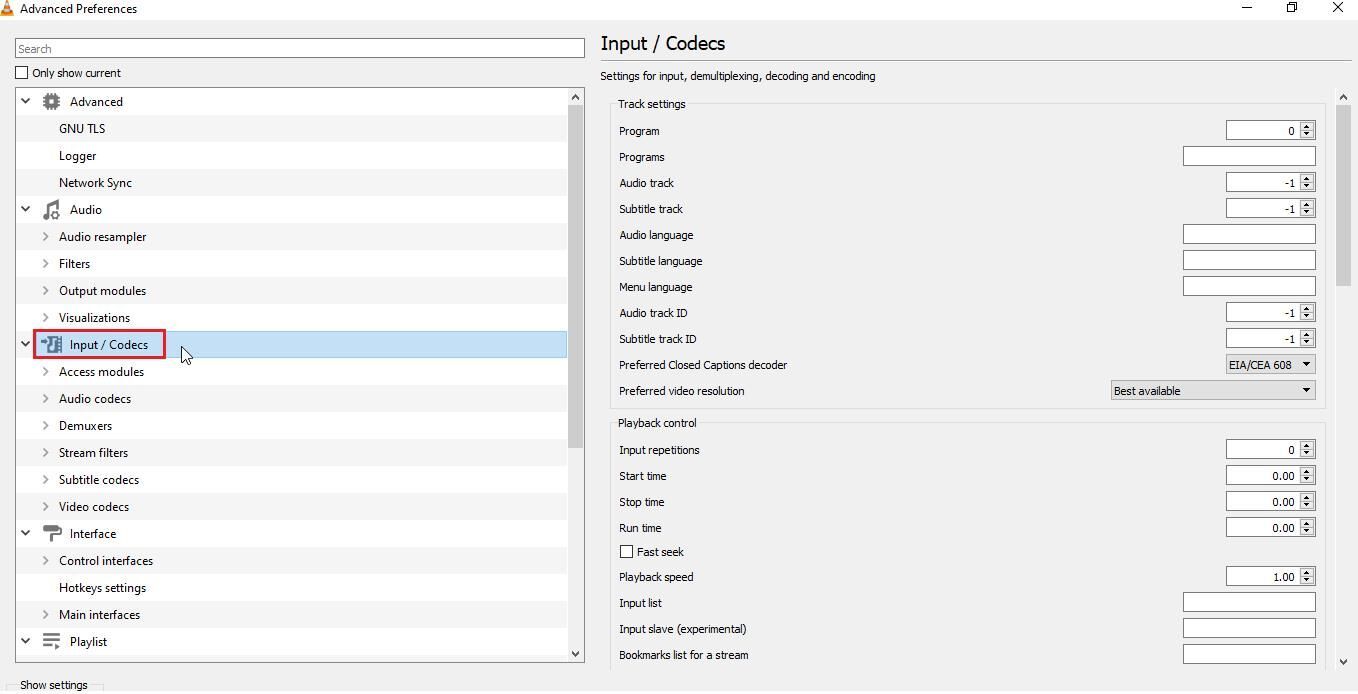
- Under Advanced, change the value next to the File Caching (ms) box ranging from 300 to 1000 or more.
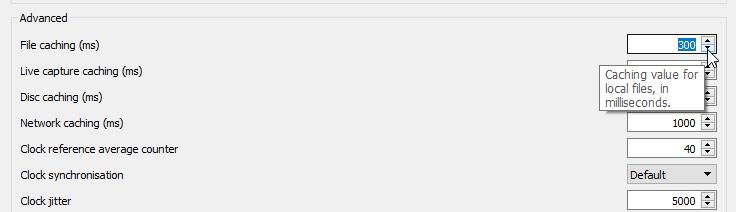
- At last, click Save and restart your VLC player.
Method 03: Change Video Output Settings in VLC Player
Last in our list of how to repair corrupted video files on Windows using an in-built VLC player is by changing your video output settings. This method best suits to fix unplayable or distorted MP4 or MOV videos in a few simple clicks. For this:
- Launch VLC Player and navigate to Tools > Preferences.
- Click Video and from the Video Settings window, change the drop-down menu next to Output settings from Automatic to DirectX (DirecDraw) video output.
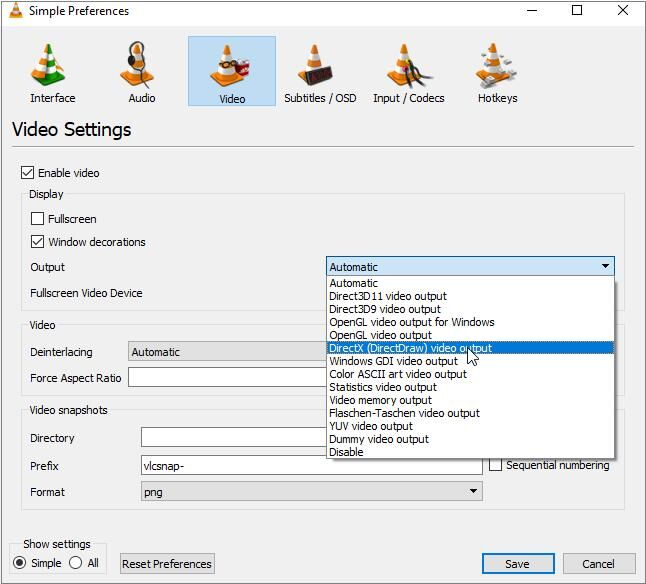
- Once done, click Save to save the changes and then restart VLC.
After successful completion of the above steps, try playing your corrupt video file in VLC.
Preventive Measures to Avoid Video Corruption Issues
Here are some additional tips that you can consider to avoid video corruption issues on Windows devices:
- Regular Backups: Maintain backups of your video files on an external drive or cloud location, like Google Drive, Google Cloud, etc. to mitigate loss in case of corruption.
- Safe Downloads: Make sure your videos are properly downloaded and transferred to prevent corruption during transfer.
- Quality Hardware: Use reliable storage devices and ensure proper ventilation to prevent hardware-related corruption.
- Updated Software: Keep the video player software and codecs installed in your video player updated to prevent compatibility issues and errors.
- Software Compatibility: Ensure compatibility between video editing software and file formats to prevent corruption during editing processes.
Wrapping Up
Hope, the above-mentioned DIY methods help you learn how to repair corrupted video files on Windows devices. Start the corrupted video file repair process by using Windows built-in VLC media player, which allows you to repair corrupt videos in multiple ways. Then move to third-party video repair software like Stellar Repair for Video tool for easy and quick repairing of your videos. Remember always to create backups of your important videos to prevent loss in case of corruption.

A well-designed user interface in a medical app is one of the most important variables that determines the success of an app. Here you’ll see ideas and strategies for creating high-quality UI designs for these types of apps.
Today you can find about 145,000 health and fitness apps, but chances are many of them have a lot of problems. It might be a good idea to start working on an application that will compete well and beat out other similar ones. However, you need to make a lot of effort to stand out among competitors and get loyal and satisfied customers.
UX/UI design at the head
The influence of UX is greater in the healthcare business than in other industries. According to many findings, UX contributes 50% to acquire a competitive edge and 33% to client retention rates. A top-tier UI/UX design may transform a healthcare app into an excellent lead-generation tool.
The main purpose of healthcare app design is to make the application accessible to all users. As a result, a sensitive target population may create certain design constraints – if you can overcome them, you’ll have an on-demand healthcare service.
How to Design Healthcare Mobile Apps
Before you start creating an app design, you need to know who your target audience is and what their geographical, socio-demographic, and psychological qualities are, since no product can cater to everyone. Users’ interests and capacities influence how they engage with an application.
Investigate other medical apps design
This stage also includes research, but it is more focused. Let’s call it competitive research. Check out what applications are already on the market before developing a useful product. Analyze leading medical apps, test them, and identify best practices. It is not about copying, but about gaining an understanding of what features are often included in a comparable product. Analyze market needs and consider what vital app features will match these criteria, what the app lacks, and what you can do to make the product easier and more helpful.
You have to guarantee that what you do is relevant and valuable to the consumers and also has the ability to quickly repurpose if something happens. As a result, your software will stand out from the crowd of comparable items.
Focus on the app functionality
When the first two processes have been completed, it is time to design the functionality. In most medical app designs, practicality and usability take precedence above aesthetics. Consider a strategy for instructional onboarding when developing a healthcare app to make the UI intuitive and assist users to avoid irritation with the user experience. Make all the basic functions in 2-3 clicks, this will increase user success.
Create a navigation plan
A simple navigation system is a must-have component for every product design. Proper navigation implies speed and usability. Doctors and patients should be able to obtain critical information quickly since it is a matter of health and life. Simple elements like the hamburger menu, tab bar, or navigation drawer enhance the user experience and the clarity of each button will enable the user to quickly find and select the services they need.
Test before release
Testing is a thorough part of creating mobile healthcare apps as it ensures the reliability, accuracy and security of the app. Thorough testing and QA is extremely important as any error or glitch in a healthcare app can lead to serious consequences such as wrong diagnosis, incorrect treatment suggestions or dangerous situations where patient data is jeopardized. Thanks to full-fledged medical software testing, developers can fix bugs in time. As well as security weaknesses, compatibility and usability issues will be eliminated before the app is dropped to users. This process improves the overall performance and usability of the app.

Keep things simple
Simplicity is the key to a good UX design for mobile health applications. Others may call this technique minimalistic. If you look at the top-ranking healthcare apps on the market, you’ll realize that they all have one thing in common: a simple or minimalistic design. There are several advantages to using a simple design. One of them is to provide users with a clean and professional environment. Isn’t that what you’re looking for during clinical visits? It should be your objective if you want to improve the UX of healthcare software.
Define the color palette
In general, the color scheme of an app is determined by the target demographic and the topic of the app. This article has some information about the topic.
The bulk of healthcare app designs is done in neutral colors, with a predominance of cold-toned blue and green colors, with white for the backdrop. Designers do so to accomplish certain goals, such as using the popular link of calming pastel hues with the healthcare business, reducing fear, and increasing trustworthiness.
Conclusion
The ability to provide value to the end user and solve business problems, including the use of colors and fonts throughout the journey, is what design is all about. Health, fitness, diet, illness, consultations, medication reminders, heart rate and oxygen monitoring – this is all a delicate and complex issue that requires careful and comprehensive consideration. Designers must constantly try to combine the very high standards of security and usability of medical applications with the aesthetics of their interfaces in order to achieve their goals of building the best medical applications in their niche.


 HOME IMPROVEMENT1 year ago
The Do’s and Don’ts of Renting Rubbish Bins for Your Next Renovation
- BUSINESS1 year ago
Exploring the Benefits of Commercial Printing

 BUSINESS1 year ago
Brand Visibility with Imprint Now and Custom Poly Mailers
- HOME IMPROVEMENT9 months ago
Get Your Grout to Gleam With These Easy-To-Follow Tips
- TECHNOLOGY11 months ago
Dizipal 608: The Tech Revolution Redefined
- HEALTH9 months ago
The Surprising Benefits of Weight Loss Peptides You Need to Know
- HEALTH9 months ago
Your Guide to Shedding Pounds in the Digital Age

 HEALTH12 months ago
Happy Hippo Kratom Reviews: Read Before You Buy!